0x01 前言
docker的使用是一个大趋势,因为k8s的快速发展以及功能太强大而让人觉得使用比较繁琐,Rancher 2也移除一些与k8s重叠的功能后以k8s管理软件定位继续发展。
Rancher 2主要对k8s的功能进行扩展,实现一些便捷的功能和应用方式,同时可以管理多个k8s集群。我不但用Rancher 2管理k8s集群,我还用它初始化k8s集群,通过这种方式可以快速地部署一套甚至几套集群而不需要参考k8s的相关文档。
0x02 准备
在部署之前先了解Rancher 2的基础架构:
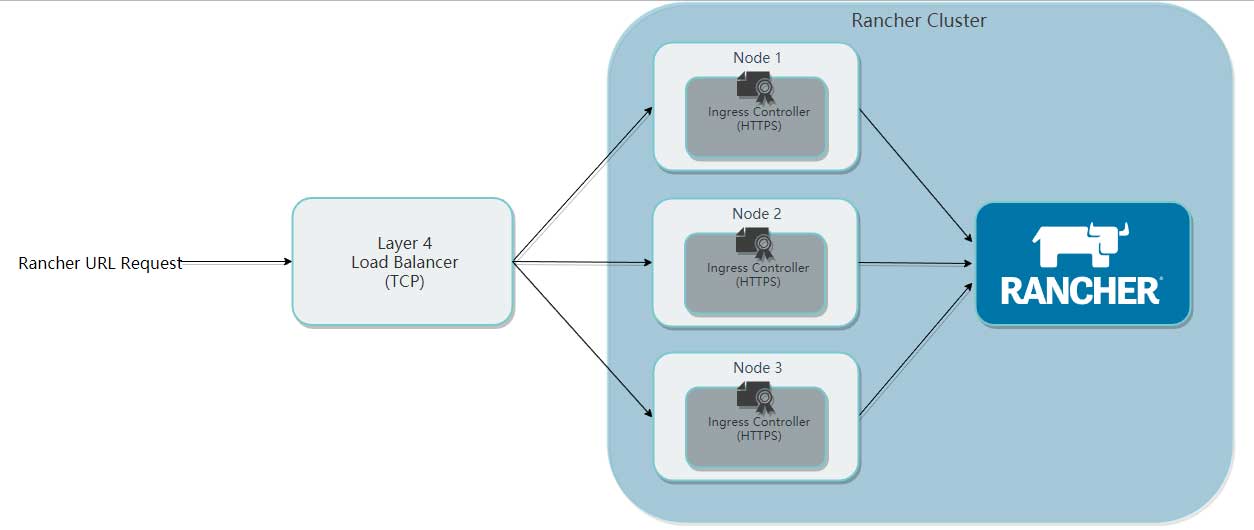
Rancher 2 Cluster其实是由一堆node组成的docker集群,每个node运行着Ingress controller,而Rancher 2一般只有一个,在Ingress controller前面有一个nginx或其他中间件提供4层负载,最终用户自能通过该负载的对外端口访问web GUI或者API。
默认情况下,Ingress controller要求使用TCP 443端口,也就是HTTPS协议,同时开放TCP 80端口,但访问的时候会重定向至HTTPS。
具体要求请留意官方文档:
在部署前需要准备以下信息或软件:
- 域名:用于访问Rancher 2 Ingress controller;
- DNS服务器:用于解析域名,如果没用,可以修改本机的hosts文件;
- kubectl:用于初始化Rancher 2节点,结束后即可移除;
- rke:Rancher Kubernetes Engine,用于建立k8s集群;
- helm:k8s包管理器;
- 阿里云镜像加速器:用于国内网络环境;
- 清华大学docker yum镜像:用于国内网络环境;
- 阿里云k8s yum镜像:用于国内网络环境。
我为我的测试环境准备以下4台虚拟机:
- rancher-lb:10.1.3.1
- rancher-node1:10.1.3.2
- rancher-node2:10.1.3.3
- rancher-node3:10.1.3.4

当然,如果你的资源不足以建立这些虚拟机,你还可以选择只建立一个Rancher 2节点,但建议保留负载均衡部分,也就是只需要建立2台虚拟机即可。
部署的命令只需要在LB机器上运行,命令会调用SSH协议在3个node上执行,根据要求,需要在LB机器上建立SSH私钥和公钥:
[root@rancher-lb ~]# ssh-keygen -t rsa -b 4096
Generating public/private rsa key pair.
Enter file in which to save the key (/root/.ssh/id_rsa):
Created directory '/root/.ssh'.
Enter passphrase (empty for no passphrase):
Enter same passphrase again:
Your identification has been saved in /root/.ssh/id_rsa.
Your public key has been saved in /root/.ssh/id_rsa.pub.
The key fingerprint is:
SHA256:AznxpuJrMVxOXwms+eLwWVgd7HCqRt8RGQpNHwUt+QE root@rancher-lb
The key's randomart image is:
+---[RSA 4096]----+
|      o+..EO.    |
|       ==oO.o    |
|      +o+B.* .   |
|      *=o * .    |
|   ..=.BSo .     |
|   .=.* =..      |
|    .B +         |
|    ..+          |
|   ..            |
+----[SHA256]-----+
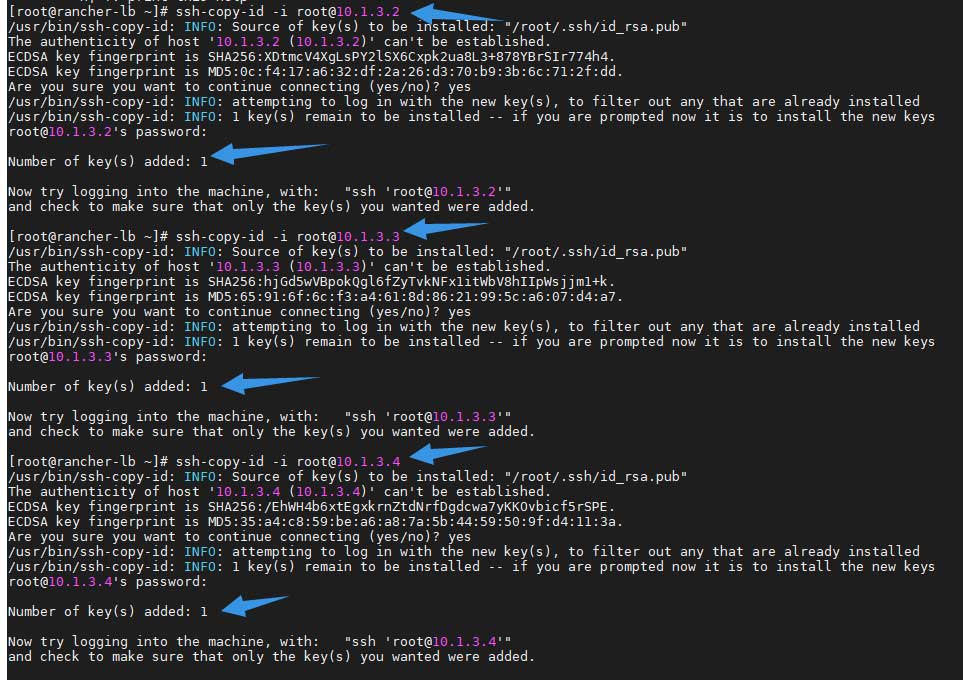
然后使用以下命令分别将公钥导入到3个node:
[root@rancher-lb ~]# ssh-copy-id -i [email protected]
然后准备阿里云镜像加速器,首先登入阿里云控制台的容器镜像服务:
然后在镜像中心找到“镜像加速器”:
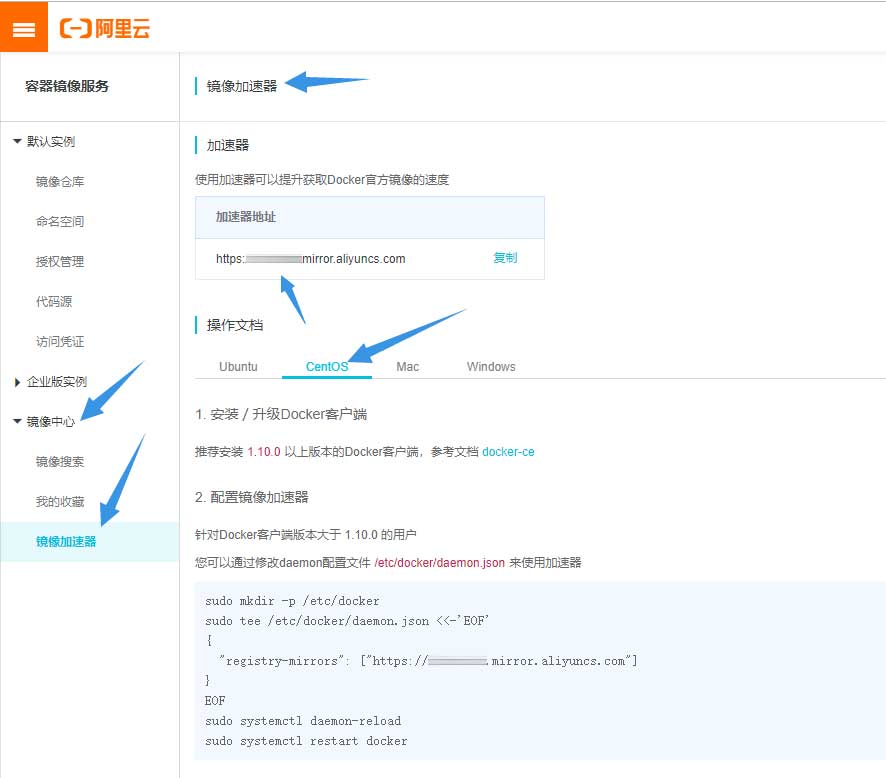
注意!这是免费服务,但不要泄露你的镜像地址。
将镜像地址中的id复制到以下脚本中:
https://[你的ID].mirror.aliyuncs.com

修改下面脚本中变量 ali_docker_mirror_userid 的值
然后准备yum源镜像,在这里需要准备Centos、epel、docker-ce与k8s的镜像,为了快速部署到系统中,我特意将他们合成在一个文件里,将以下命令全部复制至LB机器并执行:
export ali_docker_mirror_userid=xxxxxxxx

cat>/root/ngx-rancher.sh<<ngxEOF
export basearch=`arch`
export releasever=`cut -d ' ' -f 4 < /etc/redhat-release`

rm -f /etc/yum.repos.d/*.repo
cat>/etc/yum.repos.d/centos.repo<<EOF
[base]
name=CentOS-\$releasever - Base
baseurl=https://mirrors.tuna.tsinghua.edu.cn/centos/\$releasever/os/\$basearch/
#mirrorlist=http://mirrorlist.centos.org/?release=\$releasever&arch=\$basearch&repo=os
gpgcheck=0
gpgkey=file:///etc/pki/rpm-gpg/RPM-GPG-KEY-CentOS-7

#released updates
[updates]
name=CentOS-\$releasever - Updates
baseurl=https://mirrors.tuna.tsinghua.edu.cn/centos/\$releasever/updates/\$basearch/
#mirrorlist=http://mirrorlist.centos.org/?release=\$releasever&arch=\$basearch&repo=updates
gpgcheck=0
gpgkey=file:///etc/pki/rpm-gpg/RPM-GPG-KEY-CentOS-7

#additional packages that may be useful
[extras]
name=CentOS-\$releasever - Extras
baseurl=https://mirrors.tuna.tsinghua.edu.cn/centos/\$releasever/extras/\$basearch/
#mirrorlist=http://mirrorlist.centos.org/?release=\$releasever&arch=\$basearch&repo=extras
gpgcheck=0
gpgkey=file:///etc/pki/rpm-gpg/RPM-GPG-KEY-CentOS-7

#additional packages that extend functionality of existing packages
[centosplus]
name=CentOS-\$releasever - Plus
baseurl=https://mirrors.tuna.tsinghua.edu.cn/centos/\$releasever/centosplus/\$basearch/
#mirrorlist=http://mirrorlist.centos.org/?release=\$releasever&arch=\$basearch&repo=centosplus
gpgcheck=0
enabled=0
gpgkey=file:///etc/pki/rpm-gpg/RPM-GPG-KEY-CentOS-7
EOF

yum clean all
yum install epel-release -y
rm -f /etc/yum.repos.d/epel*.repo

cat>/etc/yum.repos.d/epel.repo<<EOF
[epel]
name=Extra Packages for Enterprise Linux 7 - \$basearch
baseurl=https://mirrors.tuna.tsinghua.edu.cn/epel/7/\$basearch
#mirrorlist=https://mirrors.fedoraproject.org/metalink?repo=epel-7&arch=\$basearch
failovermethod=priority
enabled=1
gpgcheck=0
gpgkey=file:///etc/pki/rpm-gpg/RPM-GPG-KEY-EPEL-7

[epel-debuginfo]
name=Extra Packages for Enterprise Linux 7 - \$basearch - Debug
baseurl=https://mirrors.tuna.tsinghua.edu.cn/epel/7/\$basearch/debug
#mirrorlist=https://mirrors.fedoraproject.org/metalink?repo=epel-debug-7&arch=\$basearch
failovermethod=priority
enabled=0
gpgkey=file:///etc/pki/rpm-gpg/RPM-GPG-KEY-EPEL-7
gpgcheck=0

[epel-source]
name=Extra Packages for Enterprise Linux 7 - \$basearch - Source
baseurl=https://mirrors.tuna.tsinghua.edu.cn/epel/7/SRPMS
#mirrorlist=https://mirrors.fedoraproject.org/metalink?repo=epel-source-7&arch=\$basearch
failovermethod=priority
enabled=0
gpgkey=file:///etc/pki/rpm-gpg/RPM-GPG-KEY-EPEL-7
gpgcheck=0
EOF

yum remove docker docker-common docker-selinux docker-engine -y
yum install -y yum-utils device-mapper-persistent-data lvm2
wget -O /etc/yum.repos.d/docker-ce.repo https://download.docker.com/linux/centos/docker-ce.repo
sudo sed -i 's+download.docker.com+mirrors.tuna.tsinghua.edu.cn/docker-ce+' /etc/yum.repos.d/docker-ce.repo

cat>/etc/yum.repos.d/kubernetes.repo<<EOF
[kubernetes]
name=Kubernetes
baseurl=https://mirrors.aliyun.com/kubernetes/yum/repos/kubernetes-el7-x86_64/
enabled=1
gpgcheck=0
EOF

systemctl disable firewalld
systemctl stop firewalld
yum install iptables.services docker-ce kubectl -y

mkdir -p /etc/docker
sudo tee /etc/docker/daemon.json <<-'EOF'
{
  "registry-mirrors": ["https://$ali_docker_mirror_userid.mirror.aliyuncs.com"]
}
EOF

systemctl daemon-reload
systemctl enable docker
systemctl start docker
systemctl status docker

useradd -g docker docker
cp -r /root/.ssh /home/docker/
chown -R docker:docker /home/docker/.ssh
ngxEOF
然后在LB机器上执行三次以下命令,IP地址分别为三个node的IP:
scp /root/ngx-rancher.sh [email protected]:/root/ && \
  ssh [email protected] "sh /root/ngx-rancher.sh"
而LB这台机器需要安装kubectl与下载以下文件nginx、rke和helm,你可以在以下地址找到最新发行版,如果不是必须,建议不要选择beta或Pre-release版本:
而kubectl则需要手动添加yum源,相关命令如下:
rm -f /etc/yum.repos.d/*.repo
cat>/etc/yum.repos.d/centos.repo<<EOF
[base]
name=CentOS-\$releasever - Base
baseurl=https://mirrors.tuna.tsinghua.edu.cn/centos/\$releasever/os/\$basearch/
#mirrorlist=http://mirrorlist.centos.org/?release=\$releasever&arch=\$basearch&repo=os
gpgcheck=0
gpgkey=file:///etc/pki/rpm-gpg/RPM-GPG-KEY-CentOS-7

#released updates
[updates]
name=CentOS-\$releasever - Updates
baseurl=https://mirrors.tuna.tsinghua.edu.cn/centos/\$releasever/updates/\$basearch/
#mirrorlist=http://mirrorlist.centos.org/?release=\$releasever&arch=\$basearch&repo=updates
gpgcheck=0
gpgkey=file:///etc/pki/rpm-gpg/RPM-GPG-KEY-CentOS-7

#additional packages that may be useful
[extras]
name=CentOS-\$releasever - Extras
baseurl=https://mirrors.tuna.tsinghua.edu.cn/centos/\$releasever/extras/\$basearch/
#mirrorlist=http://mirrorlist.centos.org/?release=\$releasever&arch=\$basearch&repo=extras
gpgcheck=0
gpgkey=file:///etc/pki/rpm-gpg/RPM-GPG-KEY-CentOS-7

#additional packages that extend functionality of existing packages
[centosplus]
name=CentOS-\$releasever - Plus
baseurl=https://mirrors.tuna.tsinghua.edu.cn/centos/\$releasever/centosplus/\$basearch/
#mirrorlist=http://mirrorlist.centos.org/?release=\$releasever&arch=\$basearch&repo=centosplus
gpgcheck=0
enabled=0
gpgkey=file:///etc/pki/rpm-gpg/RPM-GPG-KEY-CentOS-7
EOF

yum clean all
yum install epel-release -y
rm -f /etc/yum.repos.d/epel*.repo

cat>/etc/yum.repos.d/epel.repo<<EOF
[epel]
name=Extra Packages for Enterprise Linux 7 - \$basearch
baseurl=https://mirrors.tuna.tsinghua.edu.cn/epel/7/\$basearch
#mirrorlist=https://mirrors.fedoraproject.org/metalink?repo=epel-7&arch=\$basearch
failovermethod=priority
enabled=1
gpgcheck=0
gpgkey=file:///etc/pki/rpm-gpg/RPM-GPG-KEY-EPEL-7

[epel-debuginfo]
name=Extra Packages for Enterprise Linux 7 - \$basearch - Debug
baseurl=https://mirrors.tuna.tsinghua.edu.cn/epel/7/\$basearch/debug
#mirrorlist=https://mirrors.fedoraproject.org/metalink?repo=epel-debug-7&arch=\$basearch
failovermethod=priority
enabled=0
gpgkey=file:///etc/pki/rpm-gpg/RPM-GPG-KEY-EPEL-7
gpgcheck=0

[epel-source]
name=Extra Packages for Enterprise Linux 7 - \$basearch - Source
baseurl=https://mirrors.tuna.tsinghua.edu.cn/epel/7/SRPMS
#mirrorlist=https://mirrors.fedoraproject.org/metalink?repo=epel-source-7&arch=\$basearch
failovermethod=priority
enabled=0
gpgkey=file:///etc/pki/rpm-gpg/RPM-GPG-KEY-EPEL-7
gpgcheck=0
EOF

cat>/etc/yum.repos.d/kubernetes.repo<<EOF
[kubernetes]
name=Kubernetes
baseurl=https://mirrors.aliyun.com/kubernetes/yum/repos/kubernetes-el7-x86_64/
enabled=1
gpgcheck=0
EOF

systemctl disable firewalld
systemctl stop firewalld
yum install kubectl nginx wget -y

mkdir /root/rke
wget -O /root/rke/rke https://github.com/rancher/rke/releases/download/v0.2.8/rke_linux-amd64

mkdir /root/helm
wget -O /root/helm/helm.tar.gz https://get.helm.sh/helm-v2.14.3-linux-amd64.tar.gz
tar zxvf /root/helm/helm.tar.gz -C /root//helm/
准备好环境后即可开始部署。
0x03 部署K8S
这里使用RKE部署的方式部署K8S,需要在LB机器上执行命令。首先编写Rancher 2 Cluster的配置文件,采用YMAL格式:
[root@rancher-lb rke]# cat rancher-cluster.yml
nodes:
  - address: 10.1.3.2
    user: docker
    role: [controlplane,worker,etcd]
  - address: 10.1.3.3
    user: docker
    role: [controlplane,worker,etcd]
  - address: 10.1.3.4
    user: docker
    role: [controlplane,worker,etcd]

services:
  etcd:
    snapshot: true
    creation: 6h
    retention: 24h
如果在执行上面的命令之前检查过命令的话会发现三台node都创建了一个名为docker的用户,并且用户组为docker,这是因为centos的docker是以root用户运行的,但K8S需要通过非root用户执行命令。所以需要建立一个用户,并将其加入docker组,而这个用户可以实其他名字而不一定为docker。
完成配置文件的编写后即可使用以下命令部署K8S:
# 赋予可执行权限
[root@rancher-lb rke]# chmod +x ./rke

# 执行命令
[root@rancher-lb rke]# ./rke up --config ./rancher-cluster.yml
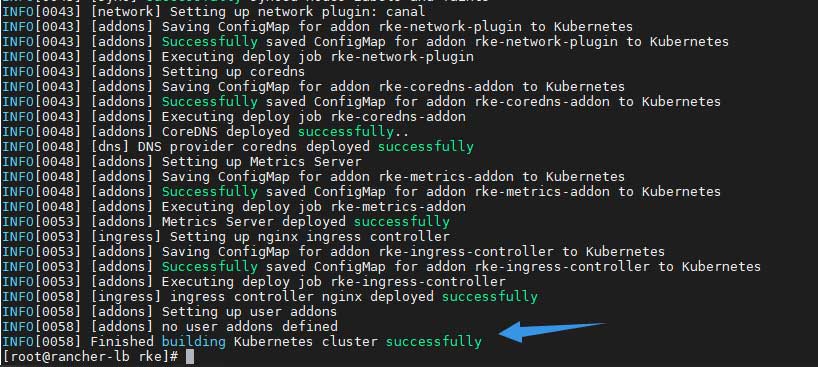
如果一切正常,最终的结果如下:
在部署K8S的过程中,可能会遇到以下错误:
FATA[0234] Failed to get job complete status for job rke-network-plugin-deploy-job in namespace kube-system
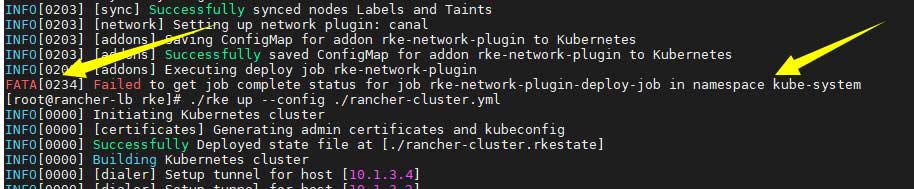
而我使用的软件版本如下:
docker: Docker version 19.03.1, build 74b1e89
RKE:Release v0.2.8
如果遇到类似问题,可以尝试不要改动任何文件,再次执行rke up命令。这可能是因网络问题导致镜像拉取缓慢,最终超时导致的。
确认集群部署完成后,检查rke目录,可以发现多出两个文件:
[root@rancher-lb rke]# ll -h
total 39M
-rw-r----- 1 root root 5.3K Sep 21 17:14 kube_config_rancher-cluster.yml
-rw-r----- 1 root root 112K Sep 21 17:15 rancher-cluster.rkestate
-rw-r--r-- 1 root root  309 Sep 21 17:09 rancher-cluster.yml
-rwxr-xr-x 1 root root  39M Sep 21 17:08 rke
- kube_config_rancher-cluster.yml:包含kubectl与helm的证书
- rancher-cluster.rkestate:包含K8S集群信息
接下来要将kube_config_rancher-cluster.yml放置到指定位置,再检查节点状态:
# 复制文件到指定位置
[root@rancher-lb rke]# mkdir $HOME/.kube && cp /root/rke/kube_config_rancher-cluster.yml $HOME/.kube/config

# 检查集群状态
[root@rancher-lb rke]# kubectl get nodes

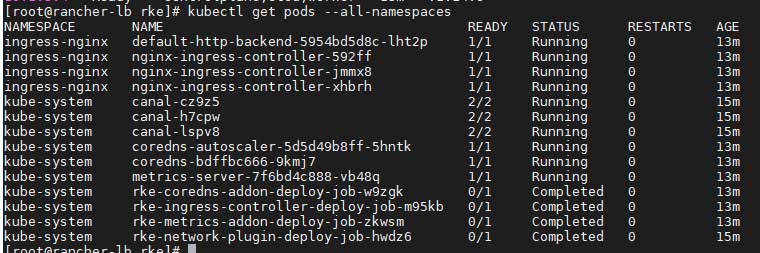
确认个节点正常,再检查所有Pods的情况:
kubectl get pods --all-namespaces
0x04 部署Tiller
Tiller是Helm的一个组成部分,作为server,主要对接K8S集群,通过chart再K8S集群上部署服务,而Helm则作为客户端,通过Helm操作Tiller server,因此,我们需要将Tiller部署到集群中。
在kube-system空间内ServiceAccount,结果如下:
[root@rancher-lb rke]# kubectl -n kube-system create serviceaccount tiller
serviceaccount/tiller created
赋予权限:
[root@rancher-lb rke]# kubectl create clusterrolebinding tiller \
>   --clusterrole=cluster-admin \
>   --serviceaccount=kube-system:tiller
clusterrolebinding.rbac.authorization.k8s.io/tiller created
最后部署Tiller服务。如果你的节点在国外,直接运行以下命令即可:
helm init --service-account tiller
如果在国内,则需要打开阿里云容器镜像服务,搜索:
google_containers/tiller
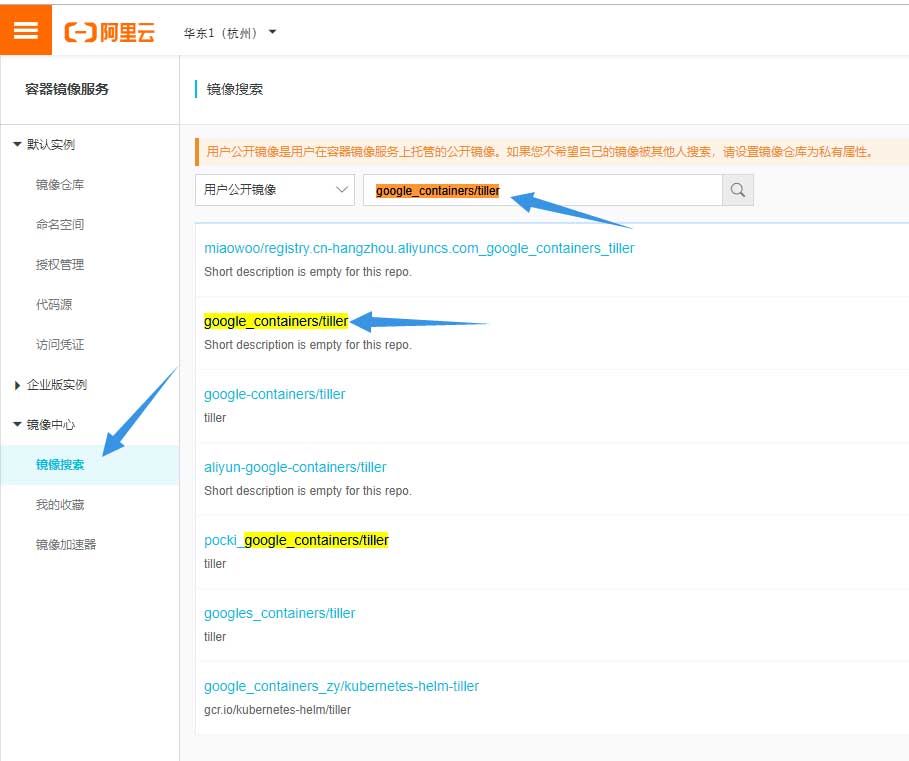
然后点击镜像,找到最新的版本号:
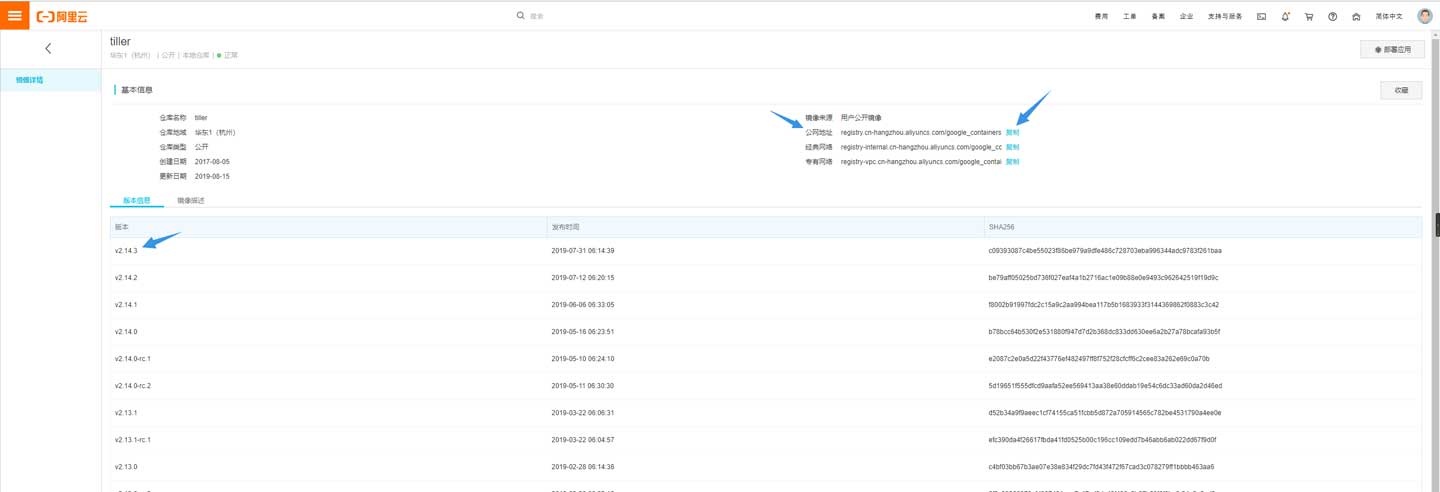
填充在以下命令中:
helm init --service-account tiller \
--tiller-image registry.cn-hangzhou.aliyuncs.com/google_containers/tiller:<tag>
执行结果如下:
[root@rancher-lb linux-amd64]# ./helm init --service-account tiller --tiller-image registry.cn-hangzhou.aliyuncs.com/google_containers/tiller:v2.14.3
Creating /root/.helm
Creating /root/.helm/repository
Creating /root/.helm/repository/cache
Creating /root/.helm/repository/local
Creating /root/.helm/plugins
Creating /root/.helm/starters
Creating /root/.helm/cache/archive
Creating /root/.helm/repository/repositories.yaml
Adding stable repo with URL: https://kubernetes-charts.storage.googleapis.com
Adding local repo with URL: http://127.0.0.1:8879/charts
$HELM_HOME has been configured at /root/.helm.

Tiller (the Helm server-side component) has been installed into your Kubernetes Cluster.

Please note: by default, Tiller is deployed with an insecure 'allow unauthenticated users' policy.
To prevent this, run `helm init` with the --tiller-tls-verify flag.
For more information on securing your installation see: https://docs.helm.sh/using_helm/#securing-your-helm-installation
验证Tiller安装是否成功:
[root@rancher-lb linux-amd64]# kubectl -n kube-system  rollout status deploy/tiller-deploy
Waiting for deployment "tiller-deploy" rollout to finish: 0 of 1 updated replicas are available...
deployment "tiller-deploy" successfully rolled out
验证Helm是否能与Tiller通讯:
[root@rancher-lb linux-amd64]# ./helm version
Client: &version.Version{SemVer:"v2.14.3", GitCommit:"0e7f3b6637f7af8fcfddb3d2941fcc7cbebb0085", GitTreeState:"clean"}
Server: &version.Version{SemVer:"v2.14.3", GitCommit:"0e7f3b6637f7af8fcfddb3d2941fcc7cbebb0085", GitTreeState:"clean"}
至此Tiller的部署以完成。
0x05 Rancher
依然在LB机器上执行命令,这时有两部分需要选择的:
- Rancher版本:
- 最新版
- 稳定版
- Alpha版
- SSL配置:
- Rancher生成
- Let’s Encrypt
- 使用现有证书文件
Rancher的版本可以在以下地址找到相应的命令:
[root@rancher-lb linux-amd64]# ./helm repo add rancher-stable https://releases.rancher.com/server-charts/stable
"rancher-stable" has been added to your repositories
因为内部服务不联网,所以我选择证书由Rancher生成,域名为:rancher-dev.t.com。
如果选择使用现有的证书文件,则不需要部署证书管理器,否则请进行以下操作:
- 安装CustomResourceDefinition 资源:
[root@rancher-lb linux-amd64]# kubectl apply -f https://raw.githubusercontent.com/jetstack/cert-manager/release-0.9/deploy/manifests/00-crds.yaml
customresourcedefinition.apiextensions.k8s.io/certificates.certmanager.k8s.io created
customresourcedefinition.apiextensions.k8s.io/certificaterequests.certmanager.k8s.io created
customresourcedefinition.apiextensions.k8s.io/challenges.certmanager.k8s.io created
customresourcedefinition.apiextensions.k8s.io/clusterissuers.certmanager.k8s.io created
customresourcedefinition.apiextensions.k8s.io/issuers.certmanager.k8s.io created
customresourcedefinition.apiextensions.k8s.io/orders.certmanager.k8s.io created
- 创建cert-manager名命空间:
[root@rancher-lb linux-amd64]# kubectl create namespace cert-manager
namespace/cert-manager created
- 关闭资源验证
[root@rancher-lb linux-amd64]# kubectl label namespace cert-manager certmanager.k8s.io/disable-validation=true
namespace/cert-manager labeled
- 添加源
[root@rancher-lb linux-amd64]# ./helm repo add jetstack https://charts.jetstack.io
"jetstack" has been added to your repositories
- 刷新缓存
[root@rancher-lb linux-amd64]# ./helm repo update
Hang tight while we grab the latest from your chart repositories...
...Skip local chart repository
...Successfully got an update from the "jetstack" chart repository
...Successfully got an update from the "rancher-stable" chart repository
...Successfully got an update from the "stable" chart repository
Update Complete.
- 安装cert-manager Helm chart
[root@rancher-lb linux-amd64]# ./helm install \
>   --name cert-manager \
>   --namespace cert-manager \
>   --version v0.9.1 \
>   jetstack/cert-manager
最终结果为:
NOTES:
cert-manager has been deployed successfully!
- 验证:
[root@rancher-lb linux-amd64]# kubectl get pods --namespace cert-manager
NAME                                     READY   STATUS    RESTARTS   AGE
cert-manager-5b9ff77b7-sk9t2             1/1     Running   0          5m15s
cert-manager-cainjector-59d69b9b-mcxm4   1/1     Running   0          5m15s
cert-manager-webhook-cfd6587ff-5vlmt     1/1     Running   0          5m15s
因为网络问题,镜像下载可能需要很长时间,请耐心等待,最终三个pods都需要为ready的状态。
然后安装Rancher,我选择由Rancher签发证书,请注意根据实际情况修改以下命令中的域名:
[root@rancher-lb linux-amd64]# ./helm install rancher-stable/rancher \
>   --name rancher \
>   --namespace cattle-system \
>   --set hostname=rancher-dev.t.com
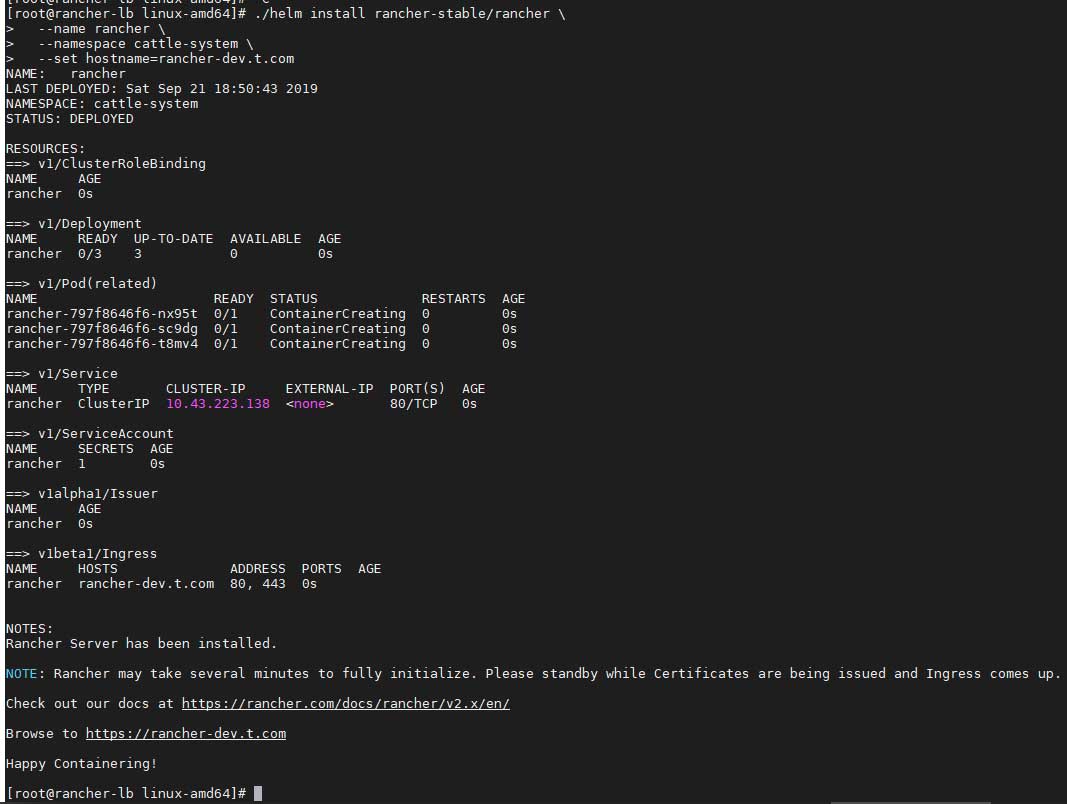
等待rolled out:
[root@rancher-lb linux-amd64]# kubectl -n cattle-system rollout status deploy/rancher
deployment "rancher" successfully rolled out
最后检查Rancher状态:
[root@rancher-lb linux-amd64]# kubectl -n cattle-system get deploy rancher
NAME      READY   UP-TO-DATE   AVAILABLE   AGE
rancher   3/3     3            3           2m38s
至此,部署Rancher的步骤已全部完成。
0x06 Nginx Load Balancer
其实现在可以使用HTTPS协议访问各个Ingress Controler,但是你会发现返还的是:
default backend - 404
或许需要修改hosts文件或使用DNS服务器,用域名访问?这里建议通过nginx实现四层负载均衡。但是nginx的stream模块并不是默认模块,需要手动编译。
在LB机器上下载nginx源码:
# 创建相关目录
[root@rancher-lb ~]# mkdir ~/codex/nginx -p && cd ~/codex/nginx

# 下载最新稳定版源码
[root@rancher-lb nginx]# wget https://nginx.org/download/nginx-1.16.1.tar.gz

# 解压文件
[root@rancher-lb nginx]# tar zxvf nginx-1.16.1.tar.gz

# 进入源码目录
[root@rancher-lb nginx]# cd nginx-1.16.1/

# 请自行解决依赖

# configure
[root@rancher-lb nginx-1.16.1]# ./configure --prefix=/usr/local/nginx --sbin-path=/usr/sbin/nginx --conf-path=/usr/local/nginx/nginx.conf --pid-path=/var/run/nginx.pid --error-log-path=/var/log/nginx/error.log --http-log-path=/var/log/nginx/access.log --lock-path=/var/lock/nginx.lock --with-http_realip_module --with-http_slice_module --with-http_ssl_module --with-http_stub_status_module --with-http_sub_module --with-http_v2_module --with-http_geoip_module --with-http_gzip_static_module --with-file-aio --with-http_degradation_module --with-libatomic --with-stream --http-client-body-temp-path=/var/tmp/nginx/client_body --http-proxy-temp-path=/var/tmp/nginx/proxy --http-fastcgi-temp-path=/var/tmp/nginx/fastcgi --http-uwsgi-temp-path=/var/tmp/nginx/uwsgi --http-scgi-temp-path=/var/tmp/nginx/scgi

# 编译与安装
[root@rancher-lb nginx-1.16.1]# make && make install
完成后请修改以下内容中的IP地址,最后在LB机器中执行:
cat>/usr/local/nginx/nginx.conf<<EOF
worker_processes 4;
worker_rlimit_nofile 40000;

events {
  worker_connections 8192;
}

stream {
  upstream rancher_servers_http {
    least_conn;
    server 10.1.3.2:80 max_fails=3 fail_timeout=5s;
    server 10.1.3.3:80 max_fails=3 fail_timeout=5s;
    server 10.1.3.4:80 max_fails=3 fail_timeout=5s;
  }
  server {
    listen     80;
    proxy_pass rancher_servers_http;
  }

  upstream rancher_servers_https {
    least_conn;
    server 10.1.3.2:443 max_fails=3 fail_timeout=5s;
    server 10.1.3.3:443 max_fails=3 fail_timeout=5s;
    server 10.1.3.4:443 max_fails=3 fail_timeout=5s;
  }
  server {
    listen     443;
    proxy_pass rancher_servers_https;
  }
}
EOF
最后测试nginx的配置文件是否正常,然后启动即可:
[root@rancher-lb ~]# nginx -t && nginx
0x07 运行
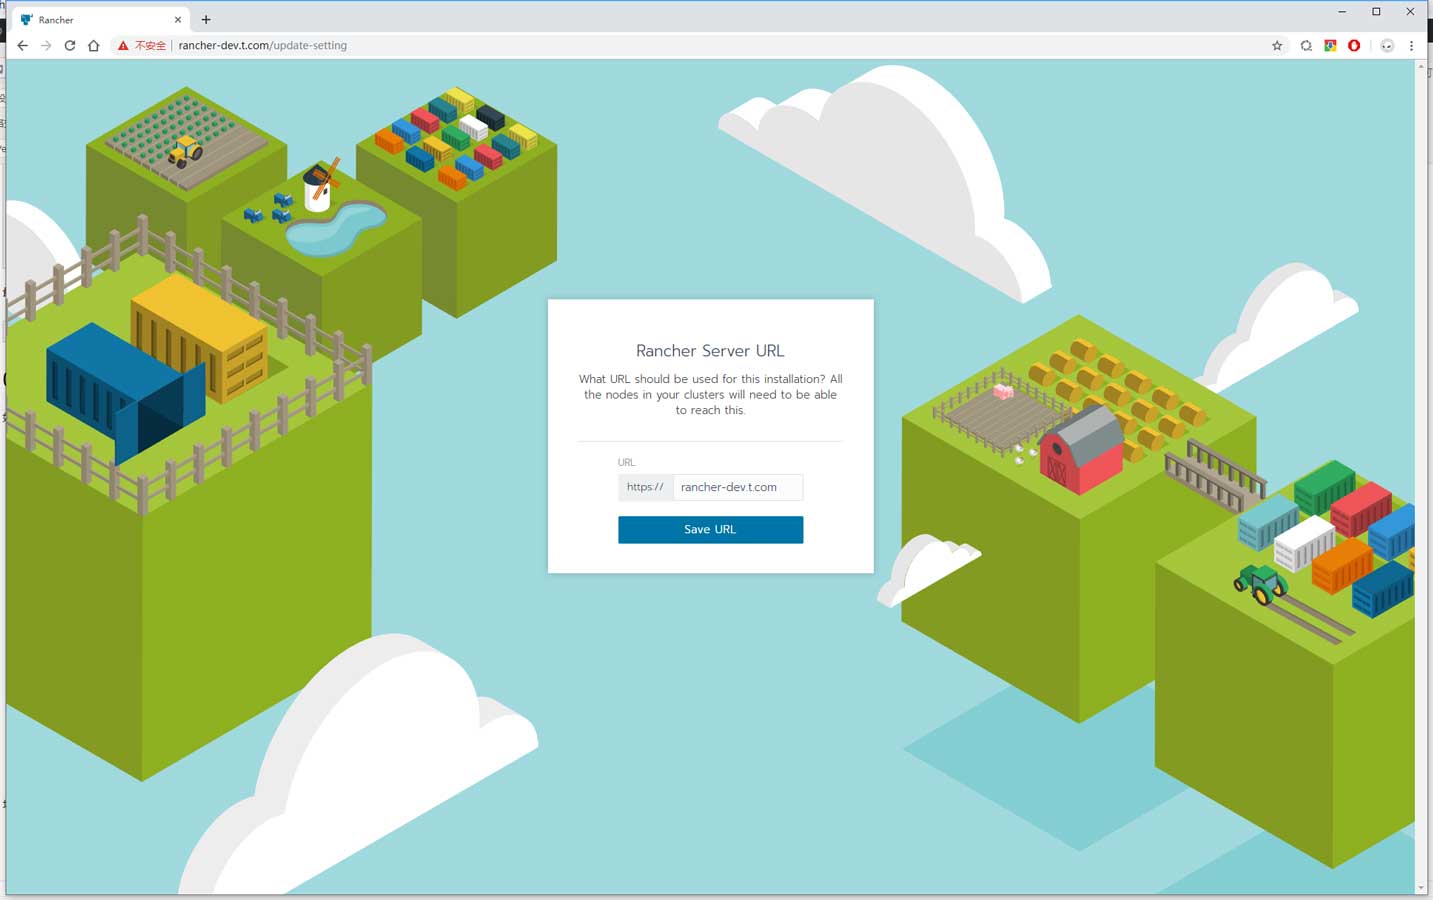
如果一切正常,通过域名打开即可看到初始设置界面:

填写好密码之后点击下一步,再确认Rancher的域名:
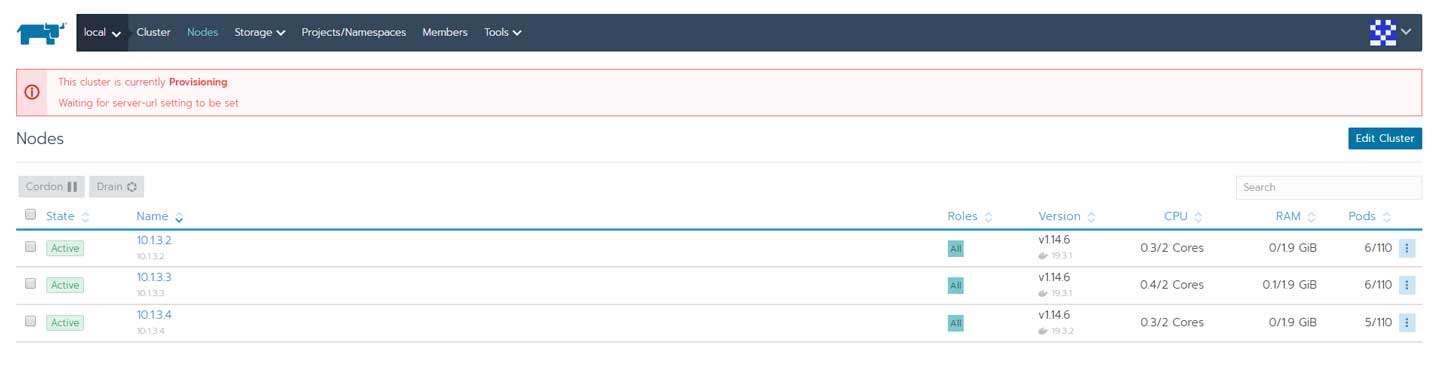
成功登入系统后可以看到名为 local 的Cluster正处于Provisioning状态,此时请耐性等待server-url的部署:
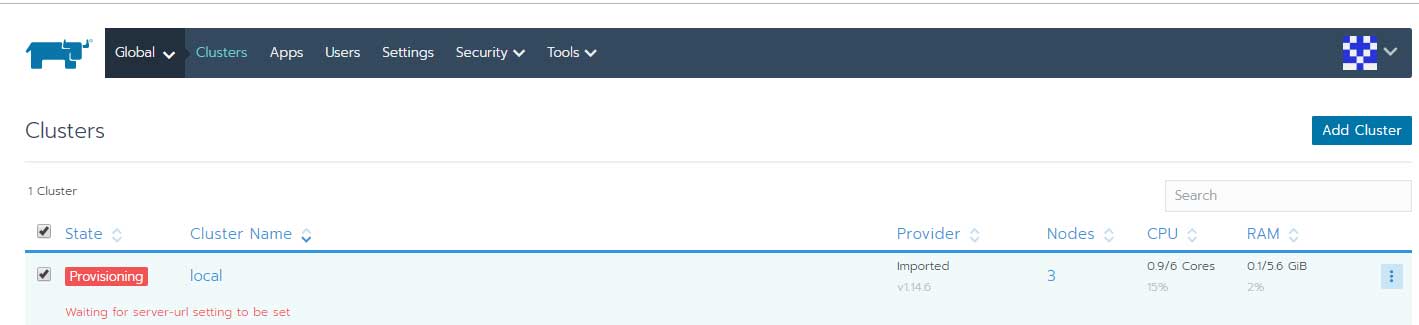
各节点状态:
0x08 结语
部署有点繁琐,但不复杂,另外部署过程对网络的依赖性较大,如果网络状况不好或者处于隔离状态,请选择离线部署模式:
ps. 这是一篇写了6小时的文章,每一行命令都经过验证,每一张图片都是实况。


