0x01 前言
我之介绍过nginx的一款防CC攻击的工具:安装并使用verynginx抵御CC攻击,今天继续介绍一款基于nignx lua的工具。它的功能比较单一,但非常强大有效,主要功能依然是抵御CC攻击。
HttpGuard和verynginx一样,主要通过技术手段检测访客是否为有效的浏览器以及是否支持跳转来判断是否需要拦截。但HttpGuard还有另一样特别本领,就是可以监测实时的连接数来判断是否需要开启防攻击模块。
0x02 安装
因为HttpGuard也是基于lua开发的,那么我依旧使用openresty(编译安装基于 Nginx 与 Lua 的高性能 Web 平台-OpenResty)进行配置。
然后通过HttpGuard的GitHub地址下载最新源码:
#新建临时文件夹
[root@web-t2 ~]# mkdir -p codex/HttpGuard

#进入临时文件夹
[root@web-t2 ~]# cd codex/HttpGuard/

#下载文件
[root@web-t2 HttpGuard]# wget https://github.com/centos-bz/HttpGuard/archive/master.zip

#解压文件
[root@web-t2 HttpGuard]# unzip master.zip
压缩包内包含的文件如下:
[root@web-t2 HttpGuard]# ll HttpGuard-master/
total 56
drwxr-xr-x 2 root root    36 Jan 27  2016 captcha
-rw-r--r-- 1 root root  7197 Jan 27  2016 config.lua
-rw-r--r-- 1 root root 31340 Jan 27  2016 guard.lua
drwxr-xr-x 2 root root    49 Jan 27  2016 html
-rw-r--r-- 1 root root  5794 Jan 27  2016 init.lua
drwxr-xr-x 2 root root    16 Jan 27  2016 logs
-rw-r--r-- 1 root root    96 Jan 27  2016 README.md
-rw-r--r-- 1 root root  2692 Jan 27  2016 runtime.lua
drwxr-xr-x 2 root root    90 Jan 27  2016 url-protect
我的nignx安装路径为:
/usr/local/nginx/
所以我将文件都复制到该目录下并修改nginx配置文件:
#复制文件到指定目录
[root@web-t2 HttpGuard]# cp -r HttpGuard-master/ /usr/local/nginx/HttpGuard

#打开nginx配置文件
[root@web-t2 HttpGuard]# vim /usr/local/nginx/nginx.conf

#在http区块中添加以下内容
lua_package_path "/usr/local/nginx/HttpGuard/?.lua";
lua_shared_dict guard_dict 100m;
lua_shared_dict dict_captcha 70m;
init_by_lua_file '/usr/local/nginx/HttpGuard/init.lua';
access_by_lua_file '/usr/local/nginx/HttpGuard/runtime.lua';
lua_max_running_timers 1;
完成后的简略nginx配置文件如下:
[root@web-t2 HttpGuard]# cat /usr/local/nginx/nginx.conf
worker_processes  1;

events {
    worker_connections  1024;
}


http {
    include       mime.types;
    default_type  application/octet-stream;

    sendfile        on;
    keepalive_timeout  65;

    server {
        listen       80;
        server_name  localhost;

        location / {
            root   html;
            index  index.html index.htm;
        }

        error_page   500 502 503 504  /50x.html;
        location = /50x.html {
            root   html;
        }
    }

    lua_package_path "/usr/local/nginx/HttpGuard/?.lua";
    lua_shared_dict guard_dict 100m;
    lua_shared_dict dict_captcha 70m;
    init_by_lua_file '/usr/local/nginx/HttpGuard/init.lua';
    access_by_lua_file '/usr/local/nginx/HttpGuard/runtime.lua';
    lua_max_running_timers 1;

}
然后修正HttpGuard的安装目录:
#打开配置文件
[root@web-t2 HttpGuard]# vim /usr/local/nginx/HttpGuard/config.lua

#修改程序目录为以下路径
baseDir = '/usr/local/nginx/HttpGuard/'
0x03 配置防御
完成上面的步骤后,如果通过以下命令测试nginx的配置,你会发现有一个错误:
[root@web-t2 HttpGuard]# nginx -t
nginx: the configuration file /usr/local/nginx/nginx.conf syntax is ok
ls: cannot access /usr/local/nginx/HttpGuard/captcha/*.png: No such file or directory
nginx: configuration file /usr/local/nginx/nginx.conf test is successful
这是因为默认的验证方法为“验证码”,但我们还没有生成验证码,所以会提示以上错误。
HttpGuard支持以下三种动作:
- captcha:验证码
- forbidden:返还403
- iptables:将IP使用iptables进行屏蔽
0x03.1 被动防御
在配置文件中:limitReqModules为被动防御模块的配置。默认情况下,当访问连接被以下文件中的正则规则匹配,该防御规则就会生效:
url-protect/limit.txt
其他参数的意义请参考配置文件中的解释,其中的数值需要根据个人的实际情况进行配置。在这里我配置成一个及其低的数值进行测试:
limitReqModules = { state = "On" , maxReqs = 1 , amongTime = 10, urlProtect = baseDir.."url-protect/limit.txt" }
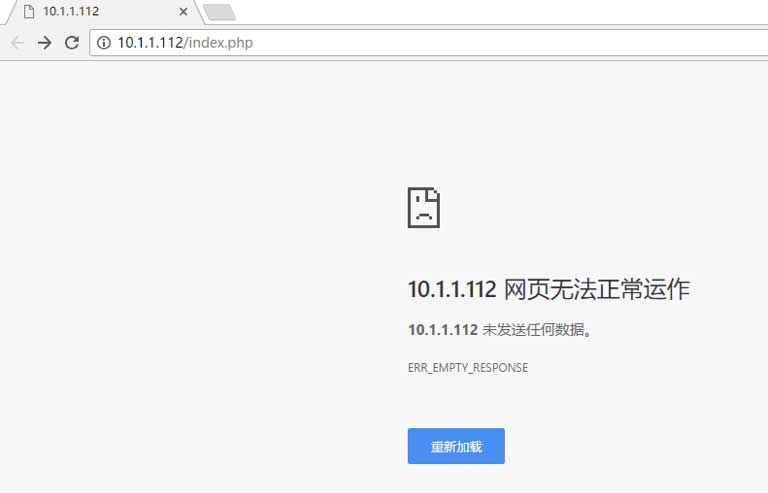
以上配置的意思是,在10秒钟内,超过最大请求数1次就将该IP打入黑洞,直接切断连接。使用浏览器测试的结果如下:
0x03.2 主动防御
主动防御模块有三个:
- redirectModules:302跳转
- JsJumpModules:js跳转
- cookieModules:cookie验证
三者的配置文件如下:
redirectModules = { state = "Off" ,verifyMaxFail = 5, keySecret = 'yK48J276hg', amongTime = 60 ,urlProtect = baseDir.."url-protect/302.txt"},
JsJumpModules = { state = "Off" ,verifyMaxFail = 5, keySecret = 'QSjL6p38h9', amongTime = 60 , urlProtect = baseDir.."url-protect/js.txt"},
cookieModules = { state = "Off" ,verifyMaxFail = 5, keySecret = 'bGMfY2D5t3', amongTime = 60 , urlProtect = baseDir.."url-protect/cookie.txt"},
他们默认的状态都是off(关闭)的,我建议如非必要,请不要打开。这会影响一些正常的用户,而且对搜索引擎蜘蛛的爬行产生很大的影响!以下是配置内容的解释:
- verifyMaxFail:最大失败次数,超过后将屏蔽IP
- keySecret:验证的token,建议将keyDefine设为dynamic,意为随机生成token;
- amongTime:验证时间段
上面配置文件的意思是:如果访客在amongTime时间内验证keySecret失败verifyMaxFail次,则打入黑洞,直接切断连接。
以下是测试,首先是redirectModules:
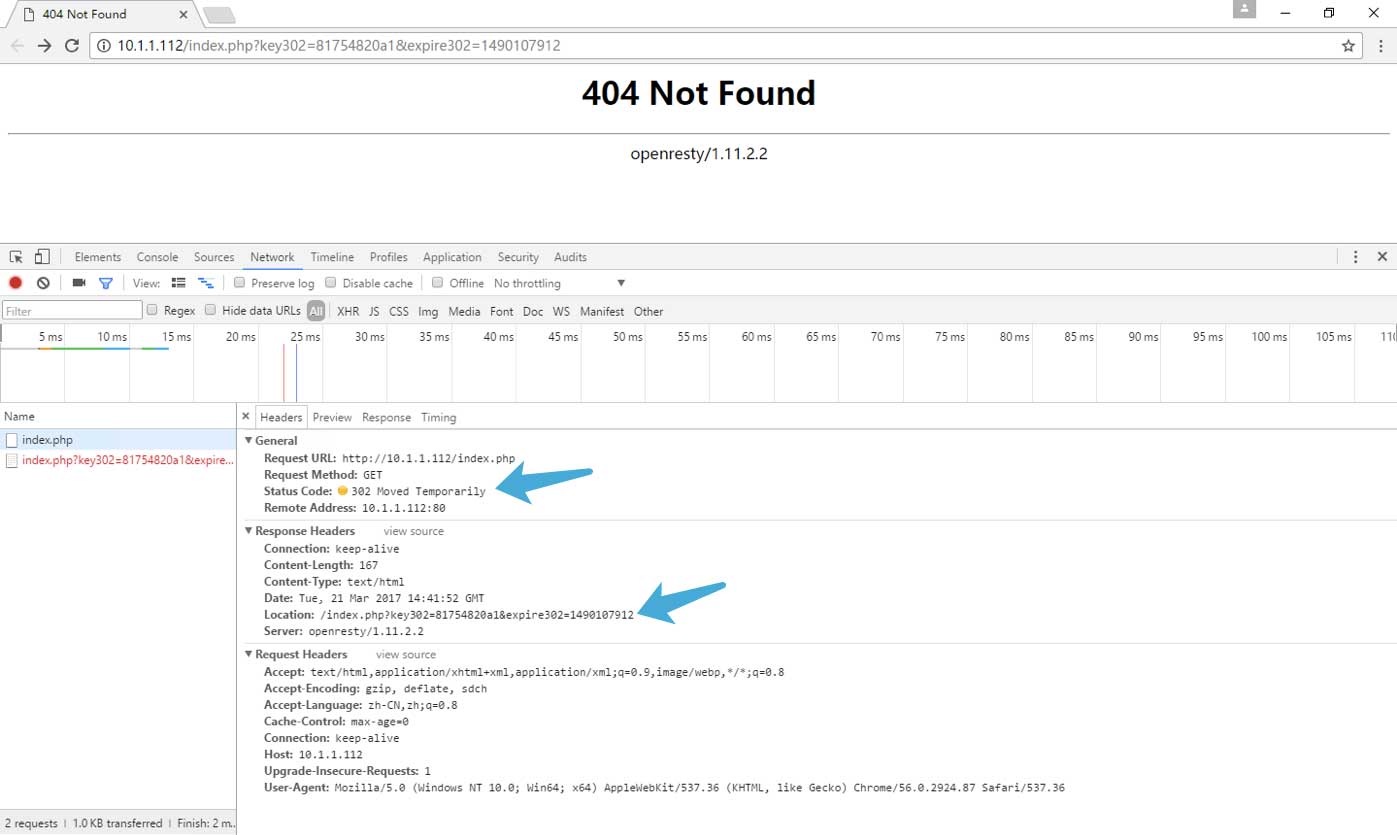
从上图可以看到,当我访问index.php时,被302重定向至一个带了key302验证key的地址,然后我通过curl访问6次,结果如下:
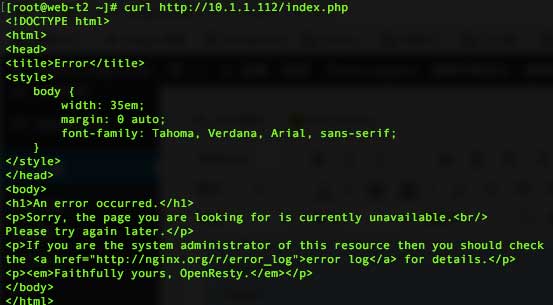
因为curl不跟随跳转,所以当尝试到第6次时,返还了错误,因为服务器没有返还任何内容。
JsJumpModules和redirectModules的结果一样,只是redirectModules跳转采用302响应头的方式,而JsJumpModules采用js的方式。
这是因为某些CC攻击软件会跟随302响应头跳转,但解析不了js,某些情况下使用JsJumpModules会更为有效。
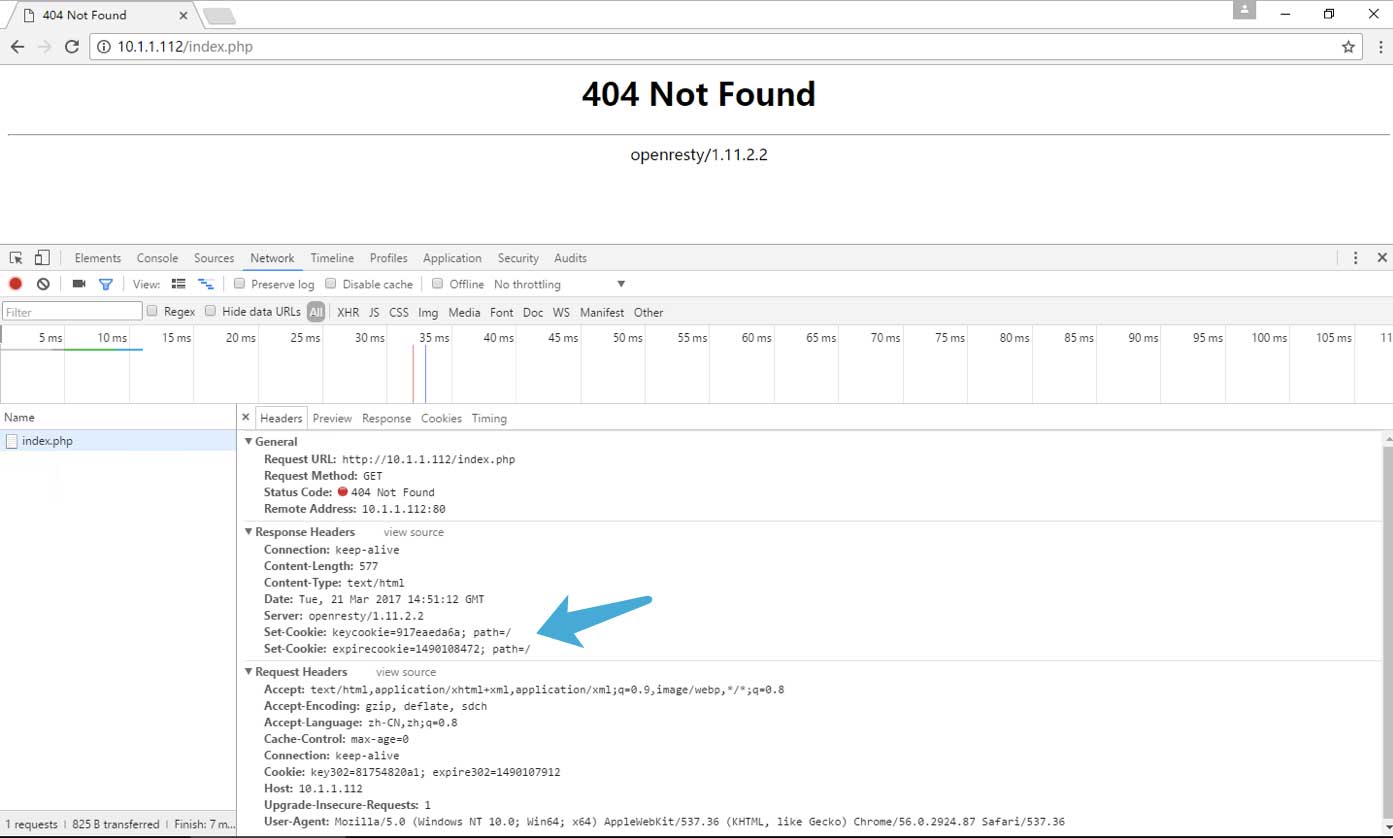
以下是cookieModules的结果:
测试页面的404并不是因为被拦截了,而是因为我这个测试服务器上没有index.php这个文件。
从上图可以看出,响应的数据被Set-Cookie,使用curl测试的结果和redirectModules测试的一样。
以上测试证明所有配置都有效,而且nginx都按照所设置的进行动作了。
0x04 自动化
在这里建议将所有功能设为off,然后启用自动启动功能:autoEnable。这能大大减少在正常状况下对用户的影响,提高服务器的服务质量。配置文件如下:
autoEnable = { state = "On", protectPort = "80", interval = 10, normalTimes = 3,exceedTimes = 2,maxConnection = 500, ssCommand = "/usr/sbin/ss" ,enableModule = "cookieModules"},
autoEnable = { state = "On", protectPort = "80", interval = 10, normalTimes = 3,exceedTimes = 2,maxConnection = 1000, ssCommand = "/usr/sbin/ss" ,enableModule = "redirectModules"},
autoEnable = { state = "On", protectPort = "443", interval = 10, normalTimes = 3,exceedTimes = 2,maxConnection = 500, ssCommand = "/usr/sbin/ss" ,enableModule = "cookieModules"},
autoEnable = { state = "On", protectPort = "443", interval = 10, normalTimes = 3,exceedTimes = 2,maxConnection = 1000, ssCommand = "/usr/sbin/ss" ,enableModule = "redirectModules"},
配置配置解释如下:
- state:该自动防御模块是否启用
- protectPort:监听、保护的端口
- interval:检查间隔
- normalTimes:检测次数
- exceedTimes:检测次数
- maxConnection:连接数
- ssCommand:ss命令的路径
- enableModule:模块
上面配置文件的意思是:每interval秒使用ss命令检查一次protectPort端口的连接数,如果连续exceedTimes超过阀值maxConnection则启动相应的模块enableModule;如果连续normalTimes次检测到的数值低于阀值,则关闭相应的模块。
这样就能在正常的时候关闭所有模块,保证不会流失用户。
0x05 验证码
如果想使用验证码进行用户验证,则需要使用php生成所需要的验证码文件:
#进入文件夹
[root@web-t2 captcha]# cd /usr/local/nginx/HttpGuard/captcha/

#生成验证码文件
[root@web-t2 HttpGuard]# /usr/local/php7/bin/php getImg.php
请先进入相应的文件夹!
请确保硬盘有足够的空间,和足够的内存。生成验证码需要一段时间,请耐心等待。
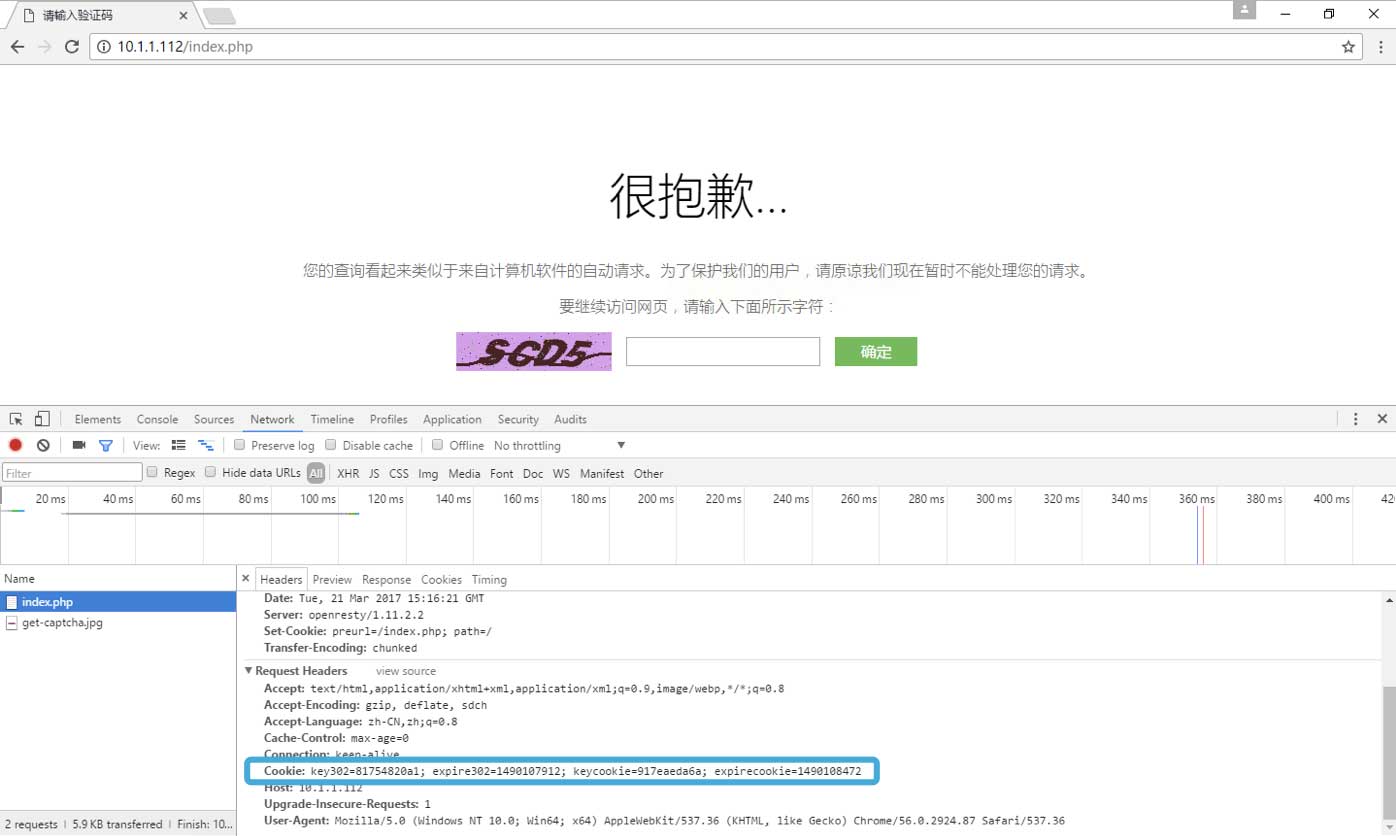
浏览器测试结果如下:
0x06 其他
-- nginx运行用户的sudo密码,blockAction值为iptables需要设置,否则不需要
sudoPass = '',

-- 表示http-guard封锁ip的时间
blockTime = 600,

-- JsJumpModules redirectModules cookieModules验证通过后,ip在白名单的时间
whiteTime = 600,

-- 用于生成token密码的key过期时间
keyExpire = 600,

-- 匹配url模式,可选值requestUri,uri
-- 值requestUri时,url-protect目录下的正则匹配的是浏览器最初请求的地址且没有被decode,带参数的链接
-- 值为uri时, url-protect目录下的正则匹配的是经过重写过的地址,不带参数,且已经decode.
urlMatchMode = "uri",
以上是一些重要的配置,摘录自配置文件。还有许多配置内容请参考配置文件中的中文解释。
0x07 链接
- 程序使用说明页面:HttpGuard使用说明
0x08 结语
这是一个非常棒的lua程序,可以极大程度地抵御CC攻击。如果能和verynginx还有naxsi搭配使用,那就更棒了。
