0x01 前言
如果有多个业务系统对外提供服务,那么一个状态展示系统可以为客户提供直观的服务状态展示。当出现系统故障或安排更新计划时可以为客户提供一个信息公开的平台,以便作出相应的准备。
经过寻找后,我决定使用一款名为Cachet的开源软件,它支持部署在Linux、Windows与Docker环境中,而在我的应用环境中,我将部署在centos 7里。
0x02 准备
Cachet需要PHP的支持,需要选择PHP 5.6.4或以上的版本,但对PHP 7的支持不太友好。
在实际的测试中,Cachet v2.4.0是支持PHP 7的,但在调用某些API时出现500错误,经过了解后发现v2.4.0还处于开发状态,因此建议部署PHP 5.6的最新版本并使用v2.3.9的Cachet。
首先需要准备LNMP环境,或者像我一样准备LNMPA环境,具体的的配置过程可以参考以下文章:
至于数据库的部分,可以选择以下数据库:
- MySQL
- PostgreSQL
- SQLite
在我的环境中会使用MySQL,如果没有相关的数据库环境,可以选用SQLite。
首先新建数据库用户以及数据库:
#新建用户
MariaDB [(none)]> create user 'cachet'@'%' identified by 'cachet';

#新建数据库
MariaDB [(none)]> create database cachet;

#将cachet数据库授权给相关用户
MariaDB [(none)]> grant all privileges on cachet.* to 'cachet'@'%';
然后新建相关目录并进入该目录:
#新建目录
[root@cachet ~]# mkdir -p /usr/local/html/cachet.t.com

#进入该目录
[root@cachet ~]# cd /usr/local/html/cachet.t.com/
clone源码并切换分支:
#clone
[root@cachet cachet.t.com]# git clone https://github.com/cachethq/Cachet.git
正克隆到 'Cachet'...
remote: Counting objects: 44417, done.
remote: Compressing objects: 100% (11/11), done.
remote: Total 44417 (delta 4), reused 10 (delta 4), pack-reused 44402
接收对象中: 100% (44417/44417), 31.20 MiB | 721.00 KiB/s, done.
处理 delta 中: 100% (29599/29599), done.

#进入源码目录
[root@cachet cachet.t.com]# cd Cachet/

#查看标签
[root@cachet Cachet]# git tag -l

#checkout
[root@cachet Cachet]# git checkout v2.3.9
Note: checking out 'v2.3.9'.

You are in 'detached HEAD' state. You can look around, make experimental
changes and commit them, and you can discard any commits you make in this
state without impacting any branches by performing another checkout.

If you want to create a new branch to retain commits you create, you may
do so (now or later) by using -b with the checkout command again. Example:

  git checkout -b new_branch_name

HEAD 目前位于 57988f0... Release v2.3.9
先来查看源码跟目录下的文件与文件夹:
[root@cachet Cachet]# tree -a -L 1
.
├── app
├── artisan
├── bootstrap
├── composer.json
├── composer.lock
├── config
├── CONTRIBUTING.md
├── database
├── .editorconfig
├── .env.example
├── .git
├── .gitattributes
├── .github
├── .gitignore
├── gulpfile.js
├── LICENSE
├── package.json
├── phpunit.xml.dist
├── public
├── README.md
├── resources
├── server.php
├── storage
├── tests
├── .travis.yml
└── VERSION
需要注意的是.env.example,这个是配置文件的模版,下面需要配置这个文件。
0x03 配置文件
先复制一份:
[root@cachet Cachet]# cp .env.example .env
配置文件有以下内容:
[root@cachet Cachet]# cat .env

APP_ENV=production
APP_DEBUG=false

#设置默认地址
APP_URL=http://cachet.t.com

#APP_KEY将用于加密
APP_KEY=SomeRandomString

#数据库类型
DB_DRIVER=mysql

#数据IP或域名
DB_HOST=localhost

#数据库名称
DB_DATABASE=cachet

#数据库用户名
DB_USERNAME=cachet

#数据库密码
DB_PASSWORD=cachet

#数据库端口
DB_PORT=3306

#数据库表前缀
DB_PREFIX=null

#缓存类型
CACHE_DRIVER=file
SESSION_DRIVER=file
QUEUE_DRIVER=sync
CACHET_EMOJI=false

#邮件配置
MAIL_DRIVER=smtp
MAIL_HOST=mailtrap.io
MAIL_PORT=2525
MAIL_USERNAME=null
MAIL_PASSWORD=null
MAIL_ADDRESS=null
MAIL_NAME=null
MAIL_ENCRYPTION=tls

#redis配置
REDIS_HOST=null
REDIS_DATABASE=null
REDIS_PORT=null

#GitHub token
GITHUB_TOKEN=null
其实这个文件里除了默认地址与数据库信息以外,其他参数都不需要配置,因为等下安装完成后,首次通过浏览器打开cachet会有一个配置过程。
0x04 安装
安装过程需要用到composer,可以通过以下命令一键安装:
[root@cachet ~]# curl -sS https://getcomposer.org/installer | sudo php -- --install-dir=/usr/local/bin --filename=composer
如果你是按照我的文章编译的PHP,那么可能会出现以下告警:
-bash: php: 未找到命令
这时候需要执行以下命令,将php的可执行文件链接到相关的文件夹即可:
[root@cachet ~]# ln /usr/local/php5/bin/php /usr/bin/
然后再次执行安装composer的命令即可:
[root@cachet ~]# curl -sS https://getcomposer.org/installer | php -- --install-dir=/usr/local/bin --filename=composer
All settings correct for using Composer
Downloading...

Composer (version 1.6.5) successfully installed to: /usr/local/bin/composer
Use it: php /usr/local/bin/composer
完成后进入cachet的源码文件夹并执行composer install:
#进入相关目录
[root@cachet ~]# cd /usr/local/html/cachet.t.com/Cachet/

#执行composer install
[root@cachet Cachet]# composer install --no-dev -o
最后出现以下提示:
Generating optimized autoload files
> Illuminate\Foundation\ComposerScripts::postInstall
> php artisan optimize --force
Generating optimized class loader
Compiling common classes
> php artisan config:cache
Configuration cache cleared!
Configuration cached successfully!
> php artisan route:cache
Route cache cleared!
Routes cached successfully!
然后执行以下命令生成APP_KEY,这个命令会自动生成base64字符串并替换配置文件中的APP_KEY:
[root@cachet Cachet]# php artisan key:generate
Application key [base64:N3boVwx3zkhxCiI24SoY86qEojcFgGtZGt1z6eq7jus=] set successfully.
在进行下一步时,如果使用mysql作为数据库,则需要确认配置文件中数据库的信息是否正确,确认无误后即可执行以下命令:
[root@cachet Cachet]# php artisan app:install
执行完该命令后会在数据库中建立相关的表:
MariaDB [cachet]> show tables;
+--------------------+
| Tables_in_cachet   |
+--------------------+
| cache              |
| component_groups   |
| component_tag      |
| components         |
| failed_jobs        |
| incident_templates |
| incidents          |
| invites            |
| jobs               |
| metric_points      |
| metrics            |
| migrations         |
| sessions           |
| settings           |
| subscribers        |
| subscriptions      |
| tags               |
| users              |
+--------------------+
18 rows in set (0.00 sec)
0x05 ngx、http与fpm
首先配置nginx,以下是我的nginx配置文件:
[root@cachet conf.d]# cat /usr/local/nginx/conf.d/cachet.t.com.ngx.conf
server {
  listen                     80;
  server_name                cachet.t.com;
  root                       /usr/local/html/cachet.t.com/public_html/public/;
  access_log                 /var/log/nginx/access.log main;
  location / {
    proxy_pass               http://127.0.0.1:8080;
    index                    index.php index.html;
    proxy_ignore_headers     Set-Cookie Expires Cache-Control X-Accel-Expires;
    proxy_cache              off;
  }
}
以下是apache的配置文件:
[root@cachet ~]# cat /etc/httpd/conf.d/cachet.t.com.apa.conf
<VirtualHost 127.0.0.1:8080>
        ServerAdmin [email protected]
        DocumentRoot /usr/local/html/cachet.t.com/public_html/public/
        ServerName cachet.t.com
        ProxyPassMatch ^/(.*\.php)$ fcgi://127.0.0.1:9004/usr/local/html/cachet.t.com/public_html/public/$1
        ErrorLog /usr/local/html/cachet.t.com/logs/apa.error.log
</VirtualHost>
以下是我的php-fpm配置文件:
[root@cachet ~]# cat /usr/local/php7/etc/php-fpm.d/cachet.t.com.conf
[cachettcom]
;useradd -M -s /sbin/nologin -n cachettcom
listen = 127.0.0.1:9004
user = cachettcom
group = daemon
pm = dynamic
pm.max_children = 50
pm.start_servers = 10
pm.min_spare_servers = 5
pm.max_spare_servers = 10
php_admin_flag[log_errors] = on
php_admin_value[error_log] = /usr/local/html/cachet.t.com/logs/fpm-php.log
php_flag[display_errors] = off
php_admin_value[memory_limit] = 256M
pm.max_requests = 3000
request_terminate_timeout = 300
为了安全起见,需要给php-fpm分配一个低权限用户,可以通过以下命令新建:
[root@cachet ~]# useradd -M -s /sbin/nologin -n cachettcom
然后重命名cachet的文件夹名称并修正权限:
#重命名
[root@cachet ~]# mv /usr/local/html/cachet.t.com/Cachet /usr/local/html/cachet.t.com/public_html/

#设置权限
[root@cachet ~]# chown -R cachettcom:daemon /usr/local/html/cachet.t.com/
一切完成后就启动各个服务,最终通过浏览器打开配置文件中所配置的域名。
但在首次打开会出现HTTP 500的错误,这时候需要删除以下文件:
[root@cachet ~]# ll /usr/local/html/cachet.t.com/public_html/bootstrap/cache
total 744
-rw-r--r-- 1 root root 589494 Jun 16 22:29 compiled.php
-rw-r--r-- 1 root root  21824 Jun 16 22:37 config.php
-rw-r--r-- 1 root root 133607 Jun 16 22:37 routes.php
-rw-r--r-- 1 root root  11574 Jun 16 22:29 services.php
使用以下命令即可:
[root@cachet ~]# rm -rf /usr/local/html/cachet.t.com/public_html/bootstrap/cache/*
再次尝试通过浏览器打开:

0x06 初始化配置
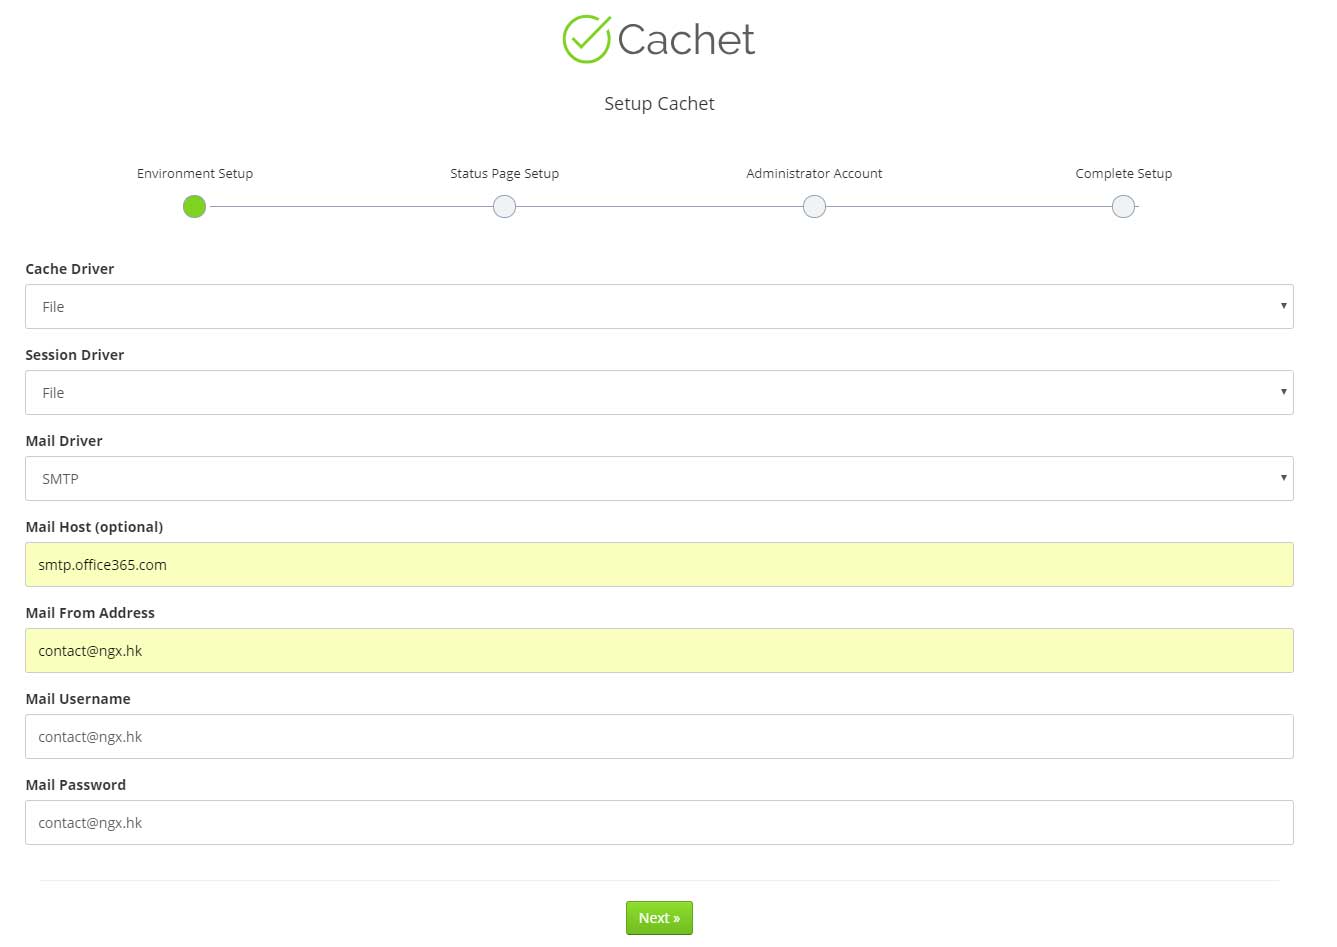
因为某些需要的服务我没有配置,所以会选择file或其他适合我测试环境的选项。如果你希望用在生产环境中,建议根据实际情况选择。
首先是配置上图中的基本环境设置:
- Cache Driver:file,缓存
- Session Driver:file,会话session
- Mail Host (optional):smtp.office365.com,SMTP服务器地址
- Mail From Address:[email protected],发件人地址
- Mail Username:邮箱用户名
- Mail Password:邮箱密码
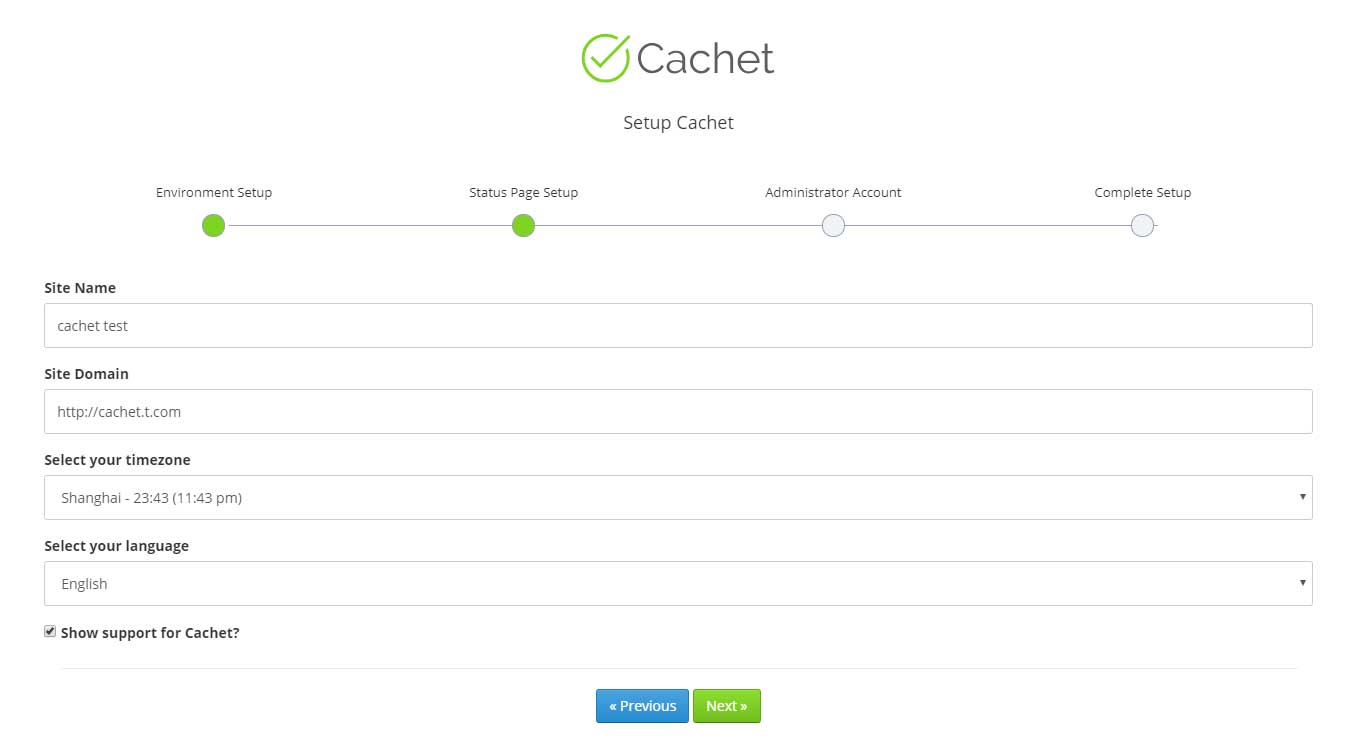
然后是站点的基本信息配置:
- Site Name:cachet test,站点名称
- Site Domain:http://cachet.t.com,站点域名
- Select your timezone:ShangHai,时区
- Select your language:简体中文,默认语言
- Show support for Cachet?:建议勾选,支持开源,勾选后会在底部显示cachet的链接
最后是管理员账户信息:
- Username:admin,管理员用户名
- Email:[email protected],管理员邮箱
- Password:admin,管理员账号的密码
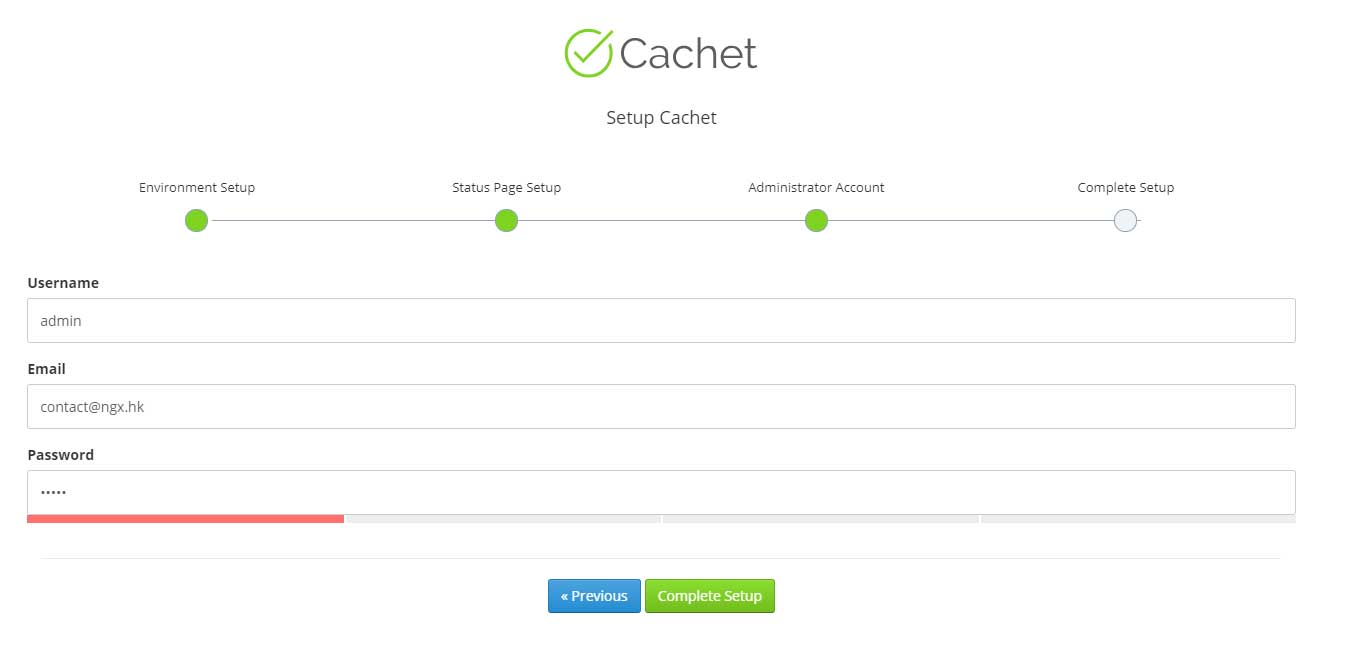
所有信息确认无误后,点击complete setup即可:

0x07 结语
cachet仅仅提供了一个展示的平台,至于数据的自动化更新,可以调用这个软件的API,支持的API可以从以下地址找到:
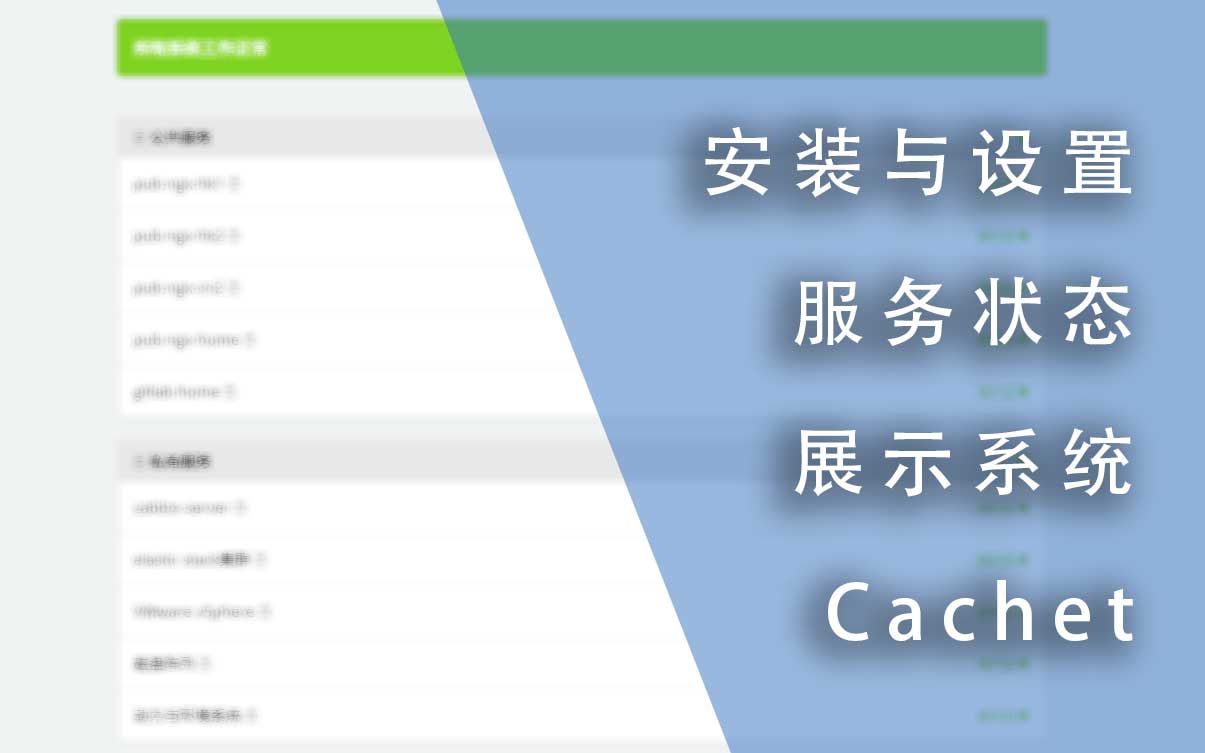
我也将某些私有项目的状态展示出来:
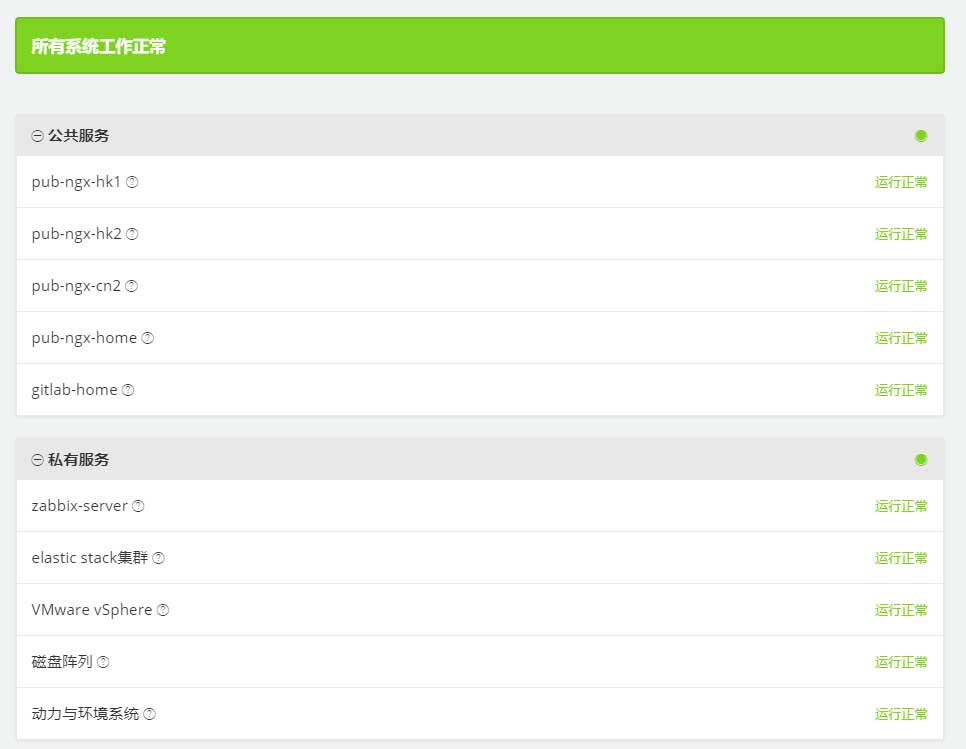
其中还包含我家中机柜的实时功率与维护计划:

以下是我services status page的地址:


