0x01 前言
最近在逛segmentfault的时候发现许多关于LNMP的问题,然后发现我的文章中并没有相关的内容。
在这里做个记录,写下我编译的过程。另外,你也可以参考以下文章:
0x02 准备
首先需要准备一台centos,准备过程可以参考:
需要开放80端口,如果需要配置HTTPS,还需要开放443端口。然后安装以下软件:
[root@centos7-test ~]# yum install yum install vim wget git htop iftop libtool make automake mlocate openssl-devel pam-devel unzip gcc screen openssl openssl-devel iptables-services bash-completion* pcre-devel openssl-devel libxslt* perl-ExtUtils-Embed at gcc-c++ python subversion gperf make rpm-build git curl bzip2-devel libcurl-devel gd gd-devel t1lib t1lib-devel libmcrypt libmcrypt-devel libtidy libtidy-devel GeoIP-devel libatomic_ops-devel zlib-devel unzip libstdc++* net-snmp net-snmp* gmp gmp-devel openldap openldap-devel net-tools -y
然后下载所需要的源代码:
- nginx,这里我使用OpenResty代替,编译函数与nginx一致。下载地址:下载OpenResty
- php7,下载地址:下载PHP7
#新建nginx源码文件夹
[root@centos7-test ~]# mkdir -p /root/codex/nginx

#新建php7源码文件夹
[root@centos7-test ~]# mkdir -p /root/codex/php7

#进入nginx源码文件夹
[root@centos7-test ~]# cd /root/codex/nginx

#下载最新版openresty
[root@centos7-test nginx]# wget https://openresty.org/download/openresty-1.11.2.2.tar.gz

#解压
[root@centos7-test nginx]# tar zxvf openresty-1.11.2.2.tar.gz

#进入php7源码文件夹
[root@centos7-test ~]# cd /root/codex/php7

#下载最新版php7
[root@centos7-test php7]# wget http://cn2.php.net/distributions/php-7.1.0.tar.gz

#解压
[root@centos7-test php7]# tar zxvf php-7.1.0.tar.gz
0x03 nginx
安装过程分为三个部分:configure、编译(make)、安装(make install)。
#进入源文件夹
[root@centos7-test php7]# cd /root/codex/nginx/openresty-1.11.2.2/

#configure
[root@centos7-test openresty-1.11.2.2]# ./configure --prefix=/usr/local/nginx --sbin-path=/usr/sbin/nginx --conf-path=/usr/local/nginx/nginx.conf --pid-path=/var/run/nginx.pid --error-log-path=/var/log/nginx/error.log --http-log-path=/var/log/nginx/access.log --lock-path=/var/lock/nginx.lock --with-luajit --with-http_gunzip_module --with-pcre --with-pcre-jit --with-http_perl_module --with-ld-opt="-Wl,-E" --with-http_realip_module --with-http_secure_link_module --with-http_slice_module --with-http_ssl_module --with-http_stub_status_module --with-http_sub_module --with-http_v2_module --with-http_addition_module --with-http_xslt_module --with-http_image_filter_module --with-http_geoip_module --with-http_dav_module --with-http_flv_module --with-http_mp4_module --with-http_gzip_static_module --with-http_auth_request_module --with-http_random_index_module --with-select_module --with-poll_module --with-file-aio --with-http_degradation_module --with-libatomic --http-client-body-temp-path=/var/tmp/nginx/client_body --http-proxy-temp-path=/var/tmp/nginx/proxy --http-fastcgi-temp-path=/var/tmp/nginx/fastcgi --http-uwsgi-temp-path=/var/tmp/nginx/uwsgi --http-scgi-temp-path=/var/tmp/nginx/scgi

#编译
[root@centos7-test openresty-1.11.2.2]# make

#安装
[root@centos7-test openresty-1.11.2.2]# make install
然后检查安装情况:
通过以下命令检查安装情况:
[root@centos7-test openresty-1.11.2.2]# nginx -v
nginx version: openresty/1.11.2.2
新建临时文件夹:
[root@centos7-test openresty-1.11.2.2]# mkdir -p /var/tmp/nginx
最后直接使用以下命令启动:
[root@centos7-test openresty-1.11.2.2]# nginx
查看启动情况:
[root@centos7-test openresty-1.11.2.2]# ps -aux | grep nginx
root      8745  0.0  0.2 105544  2276 ?        Ss   18:29   0:00 nginx: master process nginx
nobody    8746  0.0  0.3 106572  3148 ?        S    18:29   0:00 nginx: worker process
root      8749  0.0  0.0 112664   928 pts/0    S+   18:30   0:00 grep --color=auto nginx
[root@centos7-test openresty-1.11.2.2]# netstat -anp | grep 80
tcp        0      0 0.0.0.0:80              0.0.0.0:*               LISTEN      8745/nginx: master
tcp        0      0 10.1.1.122:22           10.1.1.36:40080         ESTABLISHED 1009/sshd: root@pts
在放行80端口的情况下,可以通过浏览器访问。为了方便管理,我们在nginx目录下建立文件夹并修改nginx.conf文件:
#进入nginx文件夹
[root@centos7-test openresty-1.11.2.2]# cd /usr/local/nginx/

#新建文件夹
[root@centos7-test nginx]# mkdir conf.d

#修改配置文件
[root@centos7-test nginx]# vim nginx.conf

#将server段的内容全部注释掉
server {
... ...
}

#在最后一个}的上方添加以下内容并保存
include /usr/local/nginx/conf.d/*.ngx.conf;
然后检查并重新加载nginx:
#检查配置文件是否正常
[root@centos7-test nginx]# nginx -t
nginx: the configuration file /usr/local/nginx/nginx.conf syntax is ok
nginx: configuration file /usr/local/nginx/nginx.conf test is successful

#重新加载nginx
[root@centos7-test nginx]# nginx -s reload
然后新建一个虚拟空间:
#新建虚拟目录
[root@centos7-test nginx]# mkdir -p /usr/local/html/test.t.com/public_html

#新建日志目录
[root@centos7-test nginx]# mkdir /usr/local/html/test.t.com/logs

#新建虚拟空间配置文件
[root@centos7-test nginx]# vim /usr/local/nginx/conf.d/test.t.com.ngx.conf
在test.t.com.ngx.conf中填入以下内容:
#填入以下内容
server {

    listen                  80;

    root                    /usr/local/html/test.t.com/public_html/;

    access_log              /usr/local/html/test.t.com/logs/ngx_access.log;

    location / {

        index               index.php index.html;

    }

}
最后再次检查配置文件与重新加载nginx:
#检查配置文件是否正常
[root@centos7-test nginx]# nginx -t
nginx: the configuration file /usr/local/nginx/nginx.conf syntax is ok
nginx: configuration file /usr/local/nginx/nginx.conf test is successful

#重新加载nginx
[root@centos7-test nginx]# nginx -s reload
然后新建一个index.html文件:
#新建文件并填入随意内容
[root@centos7-test nginx]# vim /usr/local/html/test.t.com/public_html/index.html
最后通过浏览器访问:

0x04 PHP7
编译PHP很简单,但在编译之前需要了解所需要的模块,下面是编译过程:
#进入源码目录
[root@centos7-test nginx]# cd /root/codex/php7/php-7.1.0/

#configure
[root@centos7-test php-7.1.0]# ./configure --prefix=/usr/local/php7 --with-fpm-user=php-fpm --with-fpm-group=php-fpm --enable-bcmath --with-bz2 --enable-calendar --with-curl --enable-exif --enable-ftp --with-gd --enable-mbstring --with-mysqli --with-pdo-mysql --with-openssl --enable-shmop --enable-soap --enable-sockets --enable-sysvsem --enable-sysvmsg --enable-sysvshm --with-tidy --enable-wddx --enable-xml --with-xmlrpc --with-xsl --enable-zip --with-zlib --enable-inline-optimization --enable-dba --with-pear --enable-fpm --enable-opcache --enable-gd-native-ttf --with-jpeg-dir --with-png-dir --with-freetype-dir --enable-gd-jis-conv --with-gettext --with-mcrypt --enable-pcntl --enable-mbregex --enable-exif --with-mhash --with-pcre-regex --with-libdir --with-kerberos --with-xpm-dir --enable-session --enable-shared --with-iconv --with-snmp --with-gmp

#编译
[root@centos7-test php-7.1.0]#  make

#安装
[root@centos7-test php-7.1.0]# make install
根据服务器的性能区别,PHP编译的时间可能会很长,要耐心等候。
编译完成后请通过以下命令复制文件到指定位置:
#建立php日志目录
[root@centos7-test php-7.1.0]# mkdir /var/log/php-fpm

#复制php.ini配置文件到指定目录
[root@centos7-test php-7.1.0]# cp -f php.ini-production /usr/local/php7/etc/php.ini

#修正php.ini配置文件的权限
[root@centos7-test php-7.1.0]# chmod 644 /usr/local/php7/etc/php.ini

#复制php-fpm.conf文件到指定目录
[root@centos7-test php-7.1.0]# cp /usr/local/php7/etc/php-fpm.conf.default /usr/local/php7/etc/php-fpm.conf

#复制启动器到指定目录
[root@centos7-test php-7.1.0]# cp -f sapi/fpm/init.d.php-fpm /etc/init.d/php-fpm7

#修正启动器的权限
[root@centos7-test php-7.1.0]# chmod 755 /etc/init.d/php-fpm7
在这里先别急着启动PHP,编译完成后还需要建立虚拟服务。请使用以下命令建立虚拟服务:
#进入php-fpm.d目录
[root@centos7-test php-fpm.d]# cd /usr/local/php7/etc/php-fpm.d/

#删除默认的配置文件
[root@centos7-test php-fpm.d]# rm -f www.conf.default

#新建配置文件
[root@centos7-test php-fpm.d]#  vim test.t.com.conf

#插入以下内容

;容器名称,可自定义
[testtcom]
;fpm进程用户
;useradd -M -s /sbin/nologin -n testtcom
;监听端口
listen = 127.0.0.1:9001
;用户
user = testtcom
;组
group = daemon
;运行方式,请自行查找PHP相关资料
pm = dynamic
pm.max_children = 30
pm.start_servers = 5
pm.min_spare_servers = 2
pm.max_spare_servers = 5
;记录日志
php_admin_flag[log_errors] = on
php_admin_value[error_log] = /usr/local/html/test.t.com/logs/fpm-php.log
php_flag[display_errors] = off
php_admin_value[memory_limit] = 256M
pm.max_requests = 3000
request_terminate_timeout = 300
添加用户并修改虚拟目录权限:
#添加用户
[root@centos7-test php-fpm.d]# useradd -M -s /sbin/nologin -n testtcom

#修改虚拟目录权限
[root@centos7-test php-fpm.d]# chown -R testtcom:daemon /usr/local/html/test.t.com
最后运行php-fpm:
[root@centos7-test php-fpm.d]# service php-fpm7 start
Starting php-fpm  done
检查php-fpm监听情况:
[root@centos7-test php-fpm.d]# netstat -anp | grep php-fpm
tcp        0      0 127.0.0.1:9001          0.0.0.0:*               LISTEN      1776/php-fpm: maste
0x05 整合
当nginx与php都安装配置完毕,即可开始整合两者。在这里只需要修改虚拟空间的配置文件即可:
#修改虚拟空间配置文件
[root@centos7-test nginx]# vim /usr/local/nginx/conf.d/test.t.com.ngx.conf

#修改fastcgi相关内容
server {

    listen                  80;

    root                    /usr/local/html/test.t.com/public_html/;

    access_log              /usr/local/html/test.t.com/logs/ngx_access.log;

    location / {

	  index               index.php index.html;

	}

    location ~ .php$ {

      fastcgi_pass 127.0.0.1:9001;

      fastcgi_index index.php;

      fastcgi_param SCRIPT_FILENAME $document_root$fastcgi_script_name;

      include fastcgi_params;

    }

}
然后检查nginx配置文件并重新加载:
#检查配置文件
[root@centos7-test ~]# nginx -t
nginx: the configuration file /usr/local/nginx/nginx.conf syntax is ok
nginx: configuration file /usr/local/nginx/nginx.conf test is successful

#重新加载nginx
[root@centos7-test ~]# nginx -s reload
最后在虚拟目录中新建一个index.php的文件并填入内容:
#打开文件
[root@centos7-test ~]# vim /usr/local/html/test.t.com/public_html/index.php

#填入以下内容
<?php
phpinfo();
?>
最后通过浏览器访问:
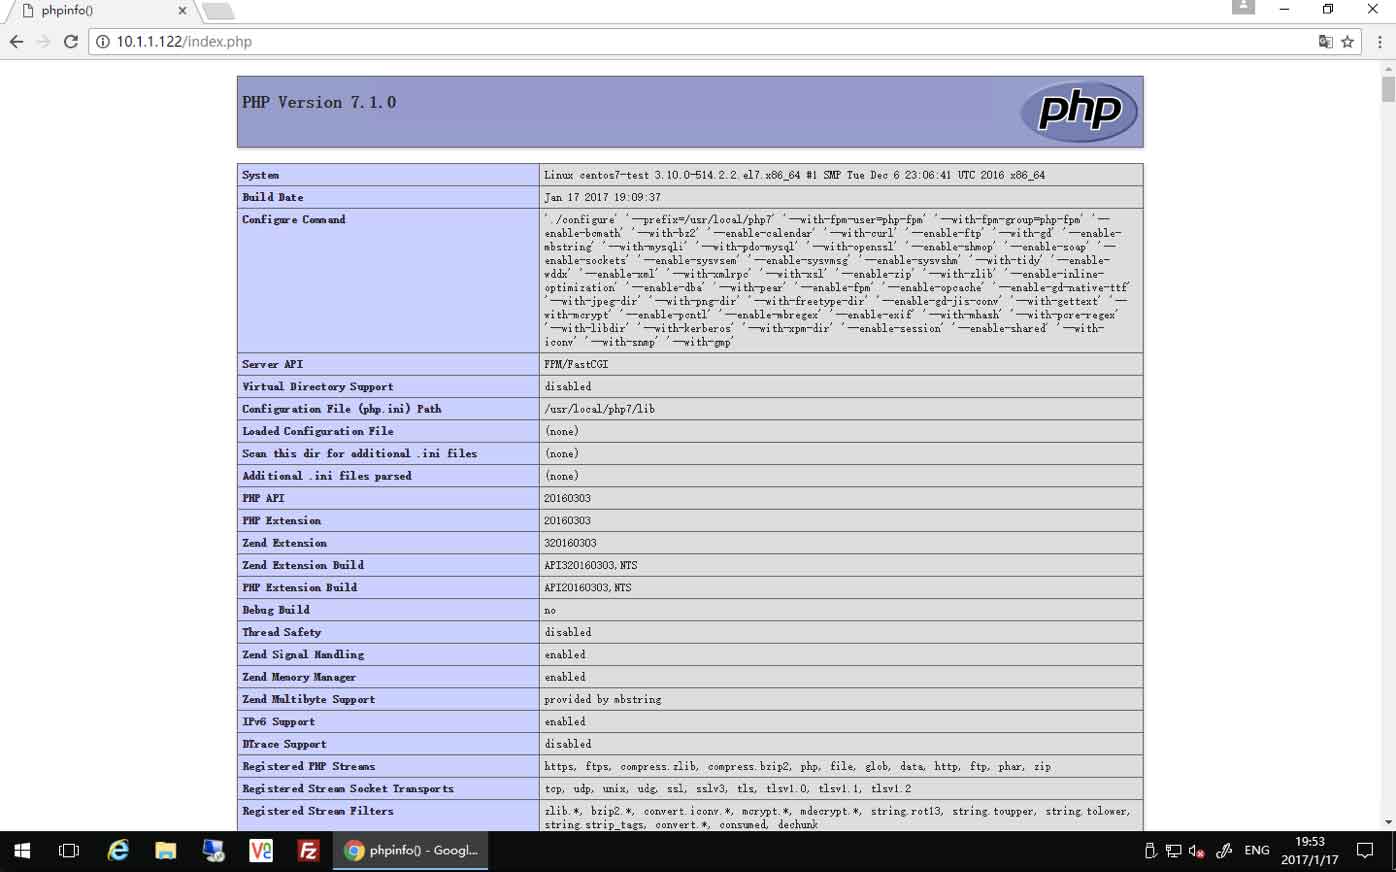
请注意phpinfo页面中的这一个路径:
/usr/local/php7/lib
我们还需要将php.ini文件创建一个软连接到这个目录中:
#创建软链接
[root@centos7-test ~]# ln -s /usr/local/php7/etc/php.ini /usr/local/php7/lib/

#查看软连接
[root@centos7-test ~]# ll /usr/local/php7/lib
总用量 4
drwxr-xr-x 15 root root 4096 1月  17 19:15 php
lrwxrwxrwx  1 root root   27 1月  17 19:56 php.ini -> /usr/local/php7/etc/php.ini

#重新启动php-fpm
[root@centos7-test ~]# service php-fpm7 restart
Gracefully shutting down php-fpm . done
Starting php-fpm  done
刷新phpinfo页面即可看到PHP已经能读取php.ini配置文件:

0x06 mariadb
最后是数据库,这里我选择安装mariadb。
#建立源
[root@centos7-test ~]# vim /etc/yum.repos.d/MariaDB.repo

#填入内容

# MariaDB 10.1 CentOS repository list - created 2017-01-17 12:01 UTC
# http://downloads.mariadb.org/mariadb/repositories/
[mariadb]
name = MariaDB
baseurl = http://yum.mariadb.org/10.1/centos7-amd64
gpgkey=https://yum.mariadb.org/RPM-GPG-KEY-MariaDB
gpgcheck=1

#安装
[root@centos7-test ~]# yum install MariaDB-server MariaDB-client
0x07 结语
编译安装过程挺繁琐的,可是自由度高。自己需要的模块可以开启,不需要的就禁用,一切尽在控制中。另外要注意的是mariadb因为源服务器在国外,速度较为缓慢,可以改用清华大学的镜像,具体地址可以在以下文章中找到:
0x08 相关视频
https://www.bilibili.com/video/av11721931/


 测试环境")


