
0x01 前言
在比较长的一段时间里我都是在windows server上运行iSpy这款开源的软件充当监控摄像头录制系统,同时它还具备移动监测等等的一系列功能。但因为资源消耗太高,而且非常卡顿的缘故,我一直在寻找合适的软件以便接替它的工作。
至于iSpy这款软件的安装配置,可以参考以下文章:
在前两周接到一位朋友的邮件提醒,告知有一款软件值得一试的:zoneminder,以下是这款软件的官网:
但我配置完成后,经过一番配置,都无法很好地驾驭这款软件。另外,这款软件的外观实在是太丑太丑了。因此,在尝试2小时后,我决定放弃它,转而继续寻找合适的软件。
最终,发现一款名为Shinobi的开源软件,安装完成后,简直可以与群晖中的surveillance station媲美!甚至有过之而无不及,毕竟Shinobi是开源免费的。
0x02 准备
以下是Shinobi的官方网站与GitHub页面:
Shinobi支持多平台,在这里我果断选用centos7.5进行配置安装。另外,Shinobi是基于nodejs的,所以需要进行环境的配置。
先根据以下文章进行配置:
然后使用以下命令安装node的源:
[root@shinobi-t1 ~]# curl --location https://rpm.nodesource.com/setup_8.x | bash -
安装完成后,在yum.repos.d目录下会有一个配置文件:
[root@shinobi-t1 ~]# ll /etc/yum.repos.d/ | grep node
-rw-r--r-- 1 root root  472 Jan  5 04:39 nodesource-el7.repo
我们需要对配置文件进行修改,将其地址修改为清华大学的镜像站地址,修改完的内容如下:
[nodesource]
name=Node.js Packages for Enterprise Linux 7 - $basearch
#baseurl=https://rpm.nodesource.com/pub_8.x/el/7/$basearch
baseurl=https://mirrors.tuna.tsinghua.edu.cn/nodesource/rpm_8.x/el/7/x86_64/
failovermethod=priority
enabled=1
gpgcheck=1
gpgkey=file:///etc/pki/rpm-gpg/NODESOURCE-GPG-SIGNING-KEY-EL

[nodesource-source]
name=Node.js for Enterprise Linux 7 - $basearch - Source
#baseurl=https://rpm.nodesource.com/pub_8.x/el/7/SRPMS
baseurl=https://mirrors.tuna.tsinghua.edu.cn/nodesource/rpm_8.x/el/7/SRPMS/
failovermethod=priority
enabled=0
gpgkey=file:///etc/pki/rpm-gpg/NODESOURCE-GPG-SIGNING-KEY-EL
gpgcheck=1
然后使用以下命令安装nodejs与npm:
[root@shinobi-t1 ~]# yum install nodejs npm -y
完成后即可将源码clone到本地:
[root@shinobi-t1 ~]# git clone https://github.com/ShinobiCCTV/Shinobi.git Shinobi
在继续往下之前,还需要修改npm的源地址:
[root@shinobi-t1 ~]# npm config set registry https://registry.npm.taobao.org

[root@shinobi-t1 ~]# npm --registry https://registry.npm.taobao.org info underscore
0x03 交互式安装
完成环境陪之后,即可进入源码文件夹并执行以下命令:
#进入文件夹
[root@shinobi-t1 ~]# cd /root/Shinobi/

#执行安装命令
[root@shinobi-t1 Shinobi]# chmod +x INSTALL/centos.sh && INSTALL/centos.sh
交互式安装的过程主要回答y或n即可,如果有某些组件已经安装或不需要的,请回答n或留空:
=========================================================
==!! Shinobi : The Open Source CCTV and NVR Solution !!==
=========================================================
To answer yes type the letter (y) in lowercase and press ENTER.
Default is no (N). Skip any components you already have or don't need.
第一个问题是是否启用超级管理员?建议启用,方便通过web管理用户:
Default Superuser : [email protected]
Default Password : admin
Shinobi - Do you want to enable superuser access?
This may be useful if passwords are forgotten or
if you would like to limit accessibility of an
account for business scenarios.
(y)es or (N)o
回答并回车后,脚本会检查nodejs,如果尚未安装或存在新的版本,则会自动使用yum进行安装或更新。
随后是会询问是否需要安装FFMPEG,这里建议安装:
=============
Shinobi - Do you want to Install FFMPEG?
(y)es or (N)o
不过回车后会弹出错误信息提示找不到“apt”这个命令,在centos里肯定找不到,查看安装文件的代码后发现相关语句中使用的并不是引号,不知道是不是这样原因导致的:
echo "Shinobi - Do you want to Install FFMPEG with `apt` or download a static version provided with `npm`?"
但这个不影响安装,如果觉得奇怪,可以手动修改INSTALL/centos.sh的第35行:
echo "Shinobi - Do you want to Install FFMPEG with 'apt' or download a static version provided with 'npm'?"
然后重新开始安装流程,这时候会询问通过哪种方式安装FFMPEG,在centos系统下,只能选择npm:
Shinobi - Do you want to Install FFMPEG with 'apt' or download a static version provided with 'npm'?
(a)pt or (N)pm
Press [ENTER] for default (npm)
完成后会询问是否安装node.js,强烈建议安装:
+ [email protected]
updated 1 package in 5.875s
Shinobi - Do you want to Install Node.js?
(y)es or (N)o
不过因为在一开始就已经安装过了,所以并没有事情发生。
下一步会询问使用哪个数据库软件,在这里我倾向于mariadb:
=============
Shinobi - Do you want to use MariaDB or SQLite3?
SQLite3 is better for small installs
MariaDB (MySQL) is better for large installs
(S)QLite3 or (M)ariaDB?
Press [ENTER] for default (MariaDB)
如果你已经拥有mariadb服务器,则下一个问题可以选择n,否则,请选择y。在这里我选择y,数据库由Shinobi自行管理即可:
=============
Shinobi - Do you want to Install MariaDB?
(y)es or (N)o
数据库的安装需要将近一分钟,请耐心等待。安装完成后是mariadb交互式的配置过程:
NOTE: RUNNING ALL PARTS OF THIS SCRIPT IS RECOMMENDED FOR ALL MariaDB
      SERVERS IN PRODUCTION USE!  PLEASE READ EACH STEP CAREFULLY!

In order to log into MariaDB to secure it, we'll need the current
password for the root user.  If you've just installed MariaDB, and
you haven't set the root password yet, the password will be blank,
so you should just press enter here.

Enter current password for root (enter for none):
以上要求输入mariadb root用户的密码,因为数据库是全新安装的,所以留空,直接回车即可。
随后会询问是否需要为root用户配置一个密码,强烈要求为root用户设立密码,请选择y:
OK, successfully used password, moving on...

Setting the root password ensures that nobody can log into the MariaDB
root user without the proper authorisation.

Set root password? [Y/n]
然后两次输入密码:
New password:
Re-enter new password:
Sorry, passwords do not match.

New password:
Re-enter new password:
Password updated successfully!
Reloading privilege tables..
 ... Success!
然后会询问是否移除匿名用户,强烈选择y将其移除:
By default, a MariaDB installation has an anonymous user, allowing anyone
to log into MariaDB without having to have a user account created for
them.  This is intended only for testing, and to make the installation
go a bit smoother.  You should remove them before moving into a
production environment.

Remove anonymous users? [Y/n] y
 ... Success!
再然后会询问是否禁用root的远程访问功能,这个请根据实际情况选择,但我建议选择n,保留root用户的远程访问权限:
Normally, root should only be allowed to connect from 'localhost'.  This
ensures that someone cannot guess at the root password from the network.

Disallow root login remotely? [Y/n] n
 ... skipping.
然后是询问是否需要移除默认的测试数据库,建议选择y将其移除:
By default, MariaDB comes with a database named 'test' that anyone can
access.  This is also intended only for testing, and should be removed
before moving into a production environment.

Remove test database and access to it? [Y/n] y
 - Dropping test database...
 ... Success!
 - Removing privileges on test database...
 ... Success!
最后是询问是否需要重新加载数据中的表,请选择y:
Reloading the privilege tables will ensure that all changes made so far
will take effect immediately.

Reload privilege tables now? [Y/n] y
 ... Success!

Cleaning up...

All done!  If you've completed all of the above steps, your MariaDB
installation should now be secure.

Thanks for using MariaDB!
至此,完成数据库配置的部分,随后安装程序会询问是否需要安装Shinobi数据库,请选择y:
=============
Shinobi - Database Installation
(y)es or (N)o
y
随后会要求输入数据库的用户名和密码,这里使用root用户及其密码:
What is your SQL Username?
root
What is your SQL Password?
Password
然后会询问是否需要创建普通用户,在这里先选择n,我们可以在安装完成后通过超级管理员进行用户的创建:
Shinobi - Do you want to create a new user for viewing and managing cameras in Shinobi? You can do this later in the Superuser panel.
(y)es or (N)o
n
完成后就会开始安装npm库,稍作等待后会继续安装PM2,这个步骤需要耐心等待,可能需要10到20分钟:
=============
Shinobi - Install NPM Libraries

> [email protected] install /root/Shinobi/node_modules/dtrace-provider
> node-gyp rebuild || node suppress-error.js

make: Entering directory `/root/Shinobi/node_modules/dtrace-provider/build'
  TOUCH Release/obj.target/DTraceProviderStub.stamp
make: Leaving directory `/root/Shinobi/node_modules/dtrace-provider/build'
npm WARN [email protected] No license field.
npm WARN optional SKIPPING OPTIONAL DEPENDENCY: [email protected] (node_modules/fsevents):
npm WARN notsup SKIPPING OPTIONAL DEPENDENCY: Unsupported platform for [email protected]: wanted {"os":"darwin","arch":"any"} (current:

added 406 packages in 31.686s
=============
Shinobi - Install PM2
/usr/bin/pm2 -> /usr/lib/node_modules/pm2/bin/pm2
/usr/bin/pm2-dev -> /usr/lib/node_modules/pm2/bin/pm2-dev
/usr/bin/pm2-docker -> /usr/lib/node_modules/pm2/bin/pm2-docker
/usr/bin/pm2-runtime -> /usr/lib/node_modules/pm2/bin/pm2-runtime
npm WARN optional SKIPPING OPTIONAL DEPENDENCY: gkt@https://tgz.pm2.io/gkt-1.0.0.tgz (node_modules/pm2/node_modules/gkt):
npm WARN network SKIPPING OPTIONAL DEPENDENCY: request to https://tgz.pm2.io/gkt-1.0.0.tgz failed, reason: connect ETIMEDOUT 163.172.101.189:443
npm WARN optional SKIPPING OPTIONAL DEPENDENCY: [email protected] (node_modules/pm2/node_modules/fsevents):
npm WARN notsup SKIPPING OPTIONAL DEPENDENCY: Unsupported platform for [email protected]: wanted {"os":"darwin","arch":"any"} (current: {"os":"linux","arch":"x64"})

+ [email protected]
added 221 packages in 466.763s
Shinobi - Finished
经过漫长的等待后会询问是否要将Shinobi设为开机启动,建议选择y:
Shinobi - Start Shinobi and set to start on boot?
(y)es or (N)o
y
一切都准备就绪后,会弹出一些重要的信息:
=====================================
=======   Login Credentials   =======
|| Username : [email protected]
|| Password : 0lO7U2
|| API Key : 6H1dojr9zdpJBDNHQOkH0iyaA2VchhP2
=====================================
=====================================
=====================================
||=====   Install Completed   =====||
=====================================
|| Login with the Superuser and create a new user!!
||===================================
|| Open http://10.1.1.97:8080/super in your web browser.
||===================================
|| Default Superuser : [email protected]
|| Default Password : admin
=====================================
=====================================
最后还需要检查pm2这个服务是否处于正常状态:
[root@shinobi-t1 Shinobi]# systemctl status pm2-root.service
● pm2-root.service - PM2 process manager
   Loaded: loaded (/etc/systemd/system/pm2-root.service; enabled; vendor preset: disabled)
   Active: inactive (dead)
     Docs: https://pm2.keymetrics.io/
虽然它已经启用开机启动功能,但是目前正处于inactive的状态,为此,可以选择重启系统,也可以手动将其启动:
[root@shinobi-t1 Shinobi]# systemctl start pm2-root.service
然后再查看它的状态:
[root@shinobi-t1 Shinobi]# systemctl status pm2-root.service
● pm2-root.service - PM2 process manager
   Loaded: loaded (/etc/systemd/system/pm2-root.service; enabled; vendor preset: disabled)
   Active: active (running) since Sat 2018-05-19 00:19:56 CST; 15s ago
     Docs: https://pm2.keymetrics.io/
  Process: 6835 ExecStart=/usr/lib/node_modules/pm2/bin/pm2 resurrect (code=exited, status=0/SUCCESS)
 Main PID: 5821 (PM2 v2.10.4: Go)
   CGroup: /system.slice/pm2-root.service
           ‣ 5821 PM2 v2.10.4: God Daemon (/root/.pm2)

May 19 00:19:56 shinobi-t1 pm2[6835]: [PM2] Resurrecting
May 19 00:19:56 shinobi-t1 pm2[6835]: [PM2] Restoring processes located in /root/.pm2/dump.pm2
May 19 00:19:56 shinobi-t1 pm2[6835]: ┌──────────┬────┬──────┬──────┬────────┬─────────┬────────┬─────┬───────────┬──────┬…────────┐
May 19 00:19:56 shinobi-t1 pm2[6835]: │ App name │ id │ mode │ pid  │ status │ restart │ uptime │ cpu │ mem       │ user │…atching │
May 19 00:19:56 shinobi-t1 pm2[6835]: ├──────────┼────┼──────┼──────┼────────┼─────────┼────────┼─────┼───────────┼──────┼…────────┤
May 19 00:19:56 shinobi-t1 pm2[6835]: │ camera   │ 0  │ fork │ 5831 │ online │ 0       │ 6m     │ 99% │ 46.3 MB   │ root │…isabled │
May 19 00:19:56 shinobi-t1 pm2[6835]: │ cron     │ 1  │ fork │ 5866 │ online │ 0       │ 6m     │ 0%  │ 32.4 MB   │ root │…isabled │
May 19 00:19:56 shinobi-t1 pm2[6835]: └──────────┴────┴──────┴──────┴────────┴─────────┴────────┴─────┴───────────┴──────┴…────────┘
May 19 00:19:56 shinobi-t1 pm2[6835]: Use `pm2 show <id|name>` to get more details about an app
May 19 00:19:56 shinobi-t1 systemd[1]: Started PM2 process manager.
Hint: Some lines were ellipsized, use -l to show in full.
0x04 使用
默认情况下监听的ip与端口分别为127.0.0.1与8080,为此,我选择通过iptables端口转发的形式对外提供访问服务。首先需要启动iptables并将其设为开机启动:
#立即启动iptables
[root@pub-ngx ~]# systemctl start iptables.service

#将iptables设为开机启动
[root@pub-ngx ~]# systemctl enable iptables.service
Created symlink from /etc/systemd/system/basic.target.wants/iptables.service to /usr/lib/systemd/system/iptables.service.
然后添加规则、保存并重新加载:
#添加规则
[root@shinobi-t1 ~]# iptables -t nat -A PREROUTING -p tcp --dport 8081 -j REDIRECT --to-ports 8080

#保存
[root@shinobi-t1 ~]# service iptables save
iptables: Saving firewall rules to /etc/sysconfig/iptables:[  OK  ]

#重新加载
[root@shinobi-t1 ~]# service iptables reload
Redirecting to /bin/systemctl reload iptables.service
最后再检查iptables:
[root@shinobi-t1 ~]# iptables -L -vn -t nat
Chain PREROUTING (policy ACCEPT 52 packets, 3285 bytes)
 pkts bytes target     prot opt in     out     source               destination
    0     0 REDIRECT   tcp  --  *      *       0.0.0.0/0            0.0.0.0/0            tcp dpt:8081 redir ports 8080
完成iptables的配置后,通过浏览器打开以下地址:
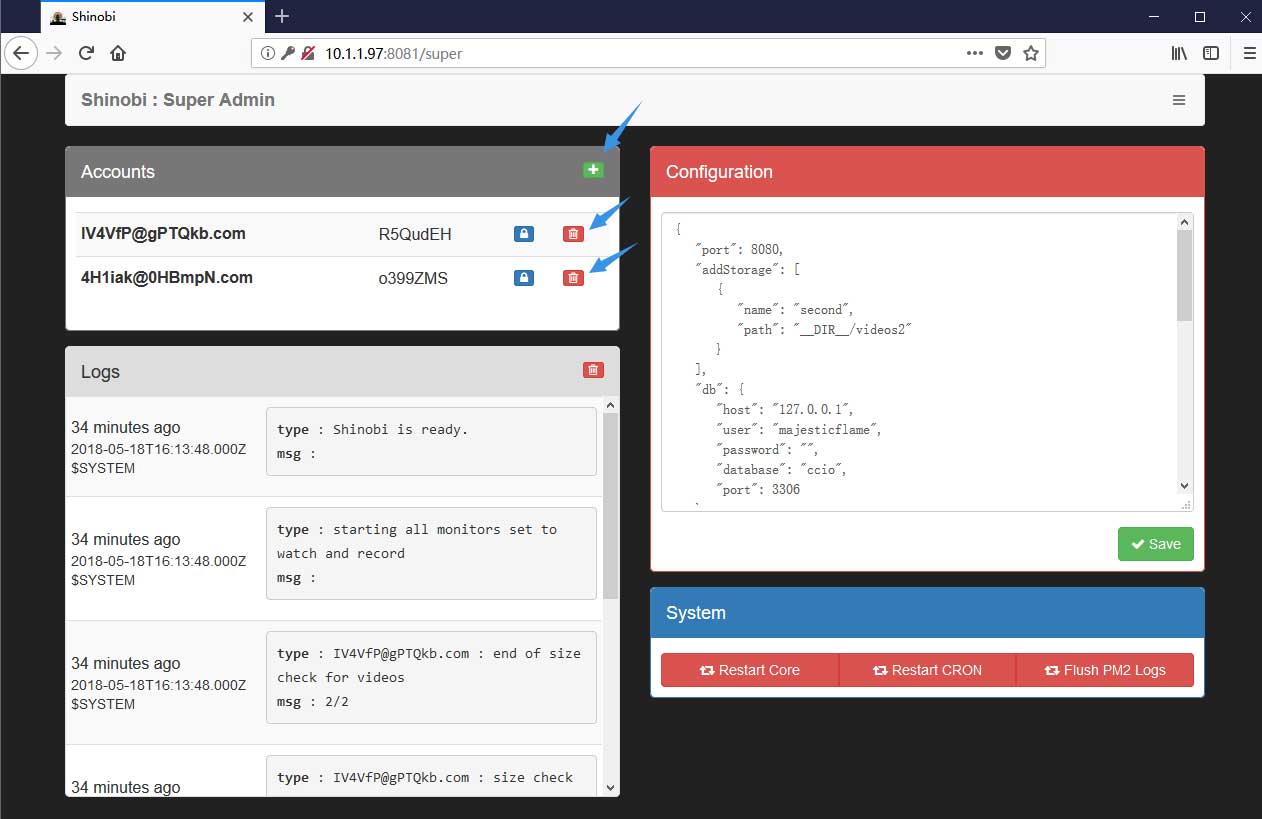
http://10.1.1.97:8081/super
并使用以下信息登入:
Username : [email protected]
Password : admin
因为我已经测试过很多次,所以这里有两个用户信息,正常情况下这里会有一个或没有用户信息的。建议将其全部删除,然后手动建立用户:
完成用户的建立工作后,即可通过以下地址登入管理界面:
http://10.1.1.97:8081
登入后的界面如下:

随后通过顶部的“+”按钮添加摄像头并点选Connection:

然后在Full URL Path输入框中填入监控摄像头的RTSP地址,例如小蚁摄像头第一代的:
rtsp://10.1.2.76:554/ch0_0.h264

完成后单击save即可保存。如果一切正常,就可以在预览视图中看到实时的图像:

0x05 结语
这款开源软件的功能也很强大,而且占用的资源非常少。因为篇幅的关系,这里仅记录了安装的过程,而使用的说明请继续关注我的博客,我将会在下一篇文章中详细讲解使用方法。


