0x01 前言
统一的时间对于服务集群、数据库甚至是个人电脑都非常重要。集群时间不一致会导致集群失败甚至是数据不能同步,家用电脑时间不正确也会导致各种各样的问题。
但服务或设备较多的情况下,让他们各自为政地从外网获取时间也有风险,因此,配置一个内部的NTP服务器非常有必要。
在我配置zabbix和ELK集群的时候就因为时间不同步导致数据在时间线上重叠,使得数据丢失了一大部分;在网站服务器集群测试中因为时间的误差巨大,使得数字证书不被信任而集群失败。
0x02 准备
在我的环境中没有用于接收GPS或北斗授时信号的硬件,淘宝上的接收模块也不贵,如果有必要,建议购买硬件设备来接收GPS和北斗信号。
而我选择采用我国各个高校的NTP服务为pfsense同步时间,再通过pfsense给内网提供NTP服务。pfsense只能添加10个NTP源服务器,以下是我目前使用的服务器域名:
s2m.time.edu.cn
s2k.time.edu.cn
s2j.time.edu.cn
s2h.time.edu.cn
s2g.time.edu.cn
s2f.time.edu.cn
s2e.time.edu.cn
s2d.time.edu.cn
s2c.time.edu.cn
s2b.time.edu.cn
以下是豆瓣上一篇附有NTP服务器地址的文章:
需要注意的是,我国高校的NTP服务器一般是ping不通的,也无法通过ntpq查看状态。这些服务器也是时断时续,所以多填写几个以便冗余。
0x03 NTP服务器
获取到了外部的NTP服务器后,下一步是配置NTP服务。首先打开pfsense的NTP设置界面Services–>NTP–>Settings:
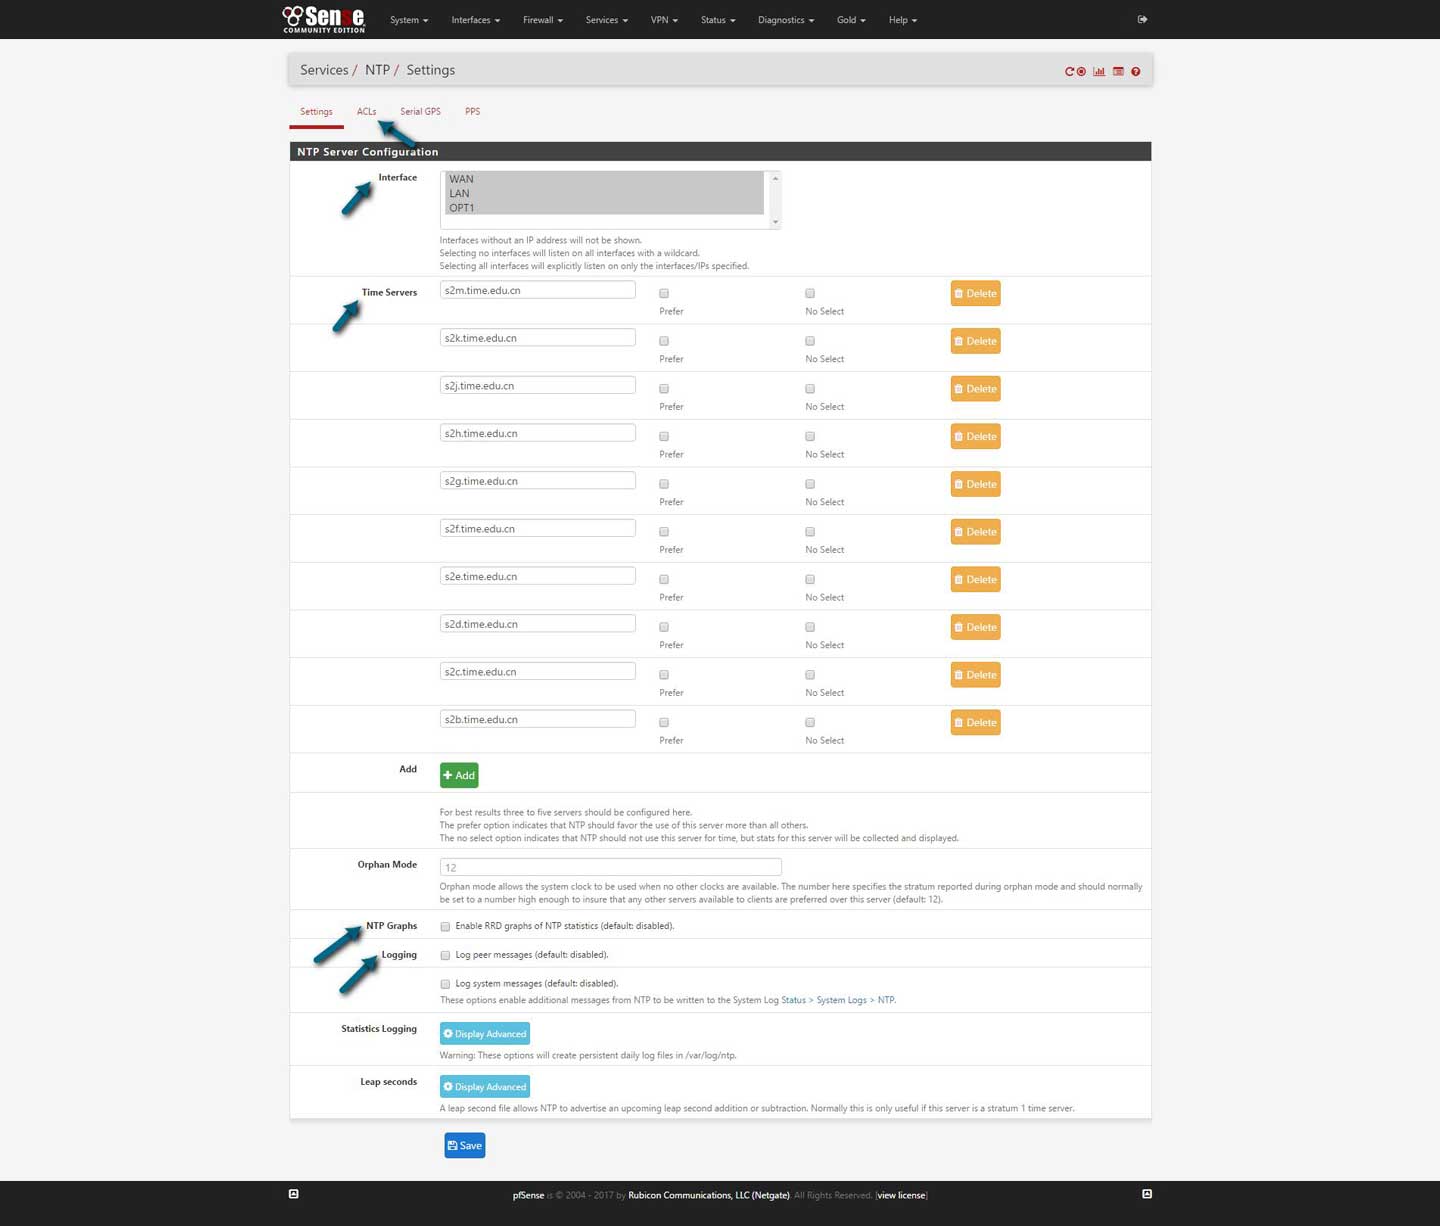
以下是一些设置项:
- Interface:监听的端口,请注意在防火墙放行UDP 123端口
- Time Servers:外部NTP服务器地址,可以填写域名或IP
- NTP Graphs:启用RRD记录图表
- Logging:启用log
你还可以通过ACL控制一些请求,例如ntpq:
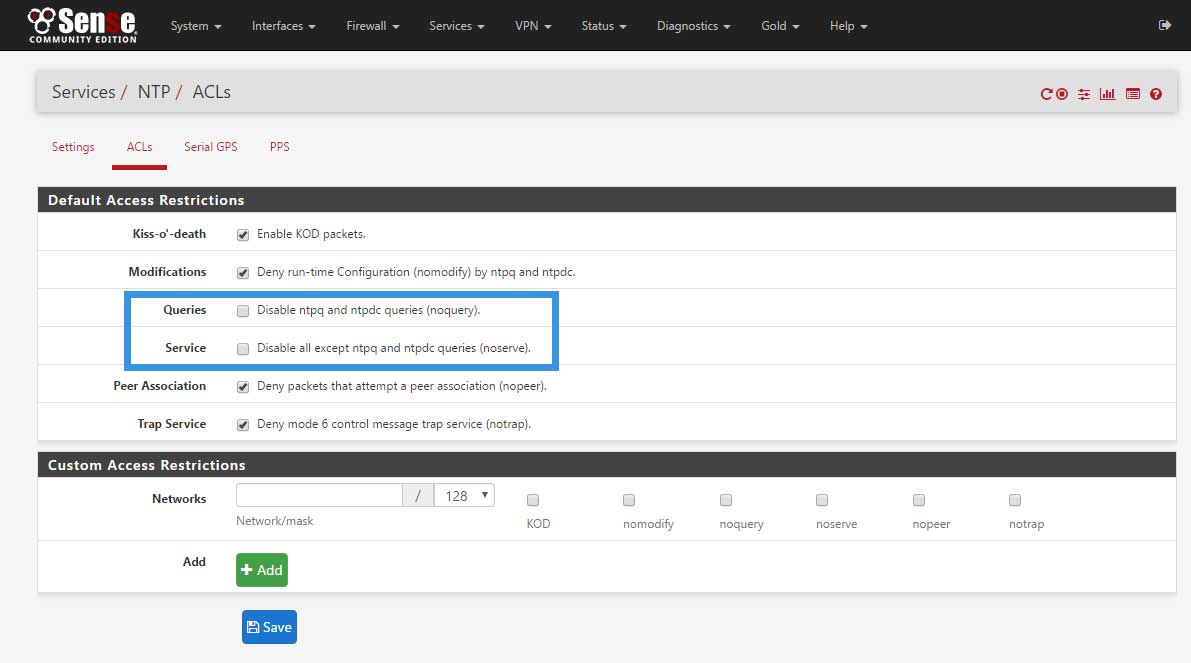
在这里我保持默认,不做限制。如果勾选了上图篮框中的内容,那么下面的检查步骤则无法继续进行。
0x04 检查
保存后查看一下服务状态,如果未启动则手动启动即可:
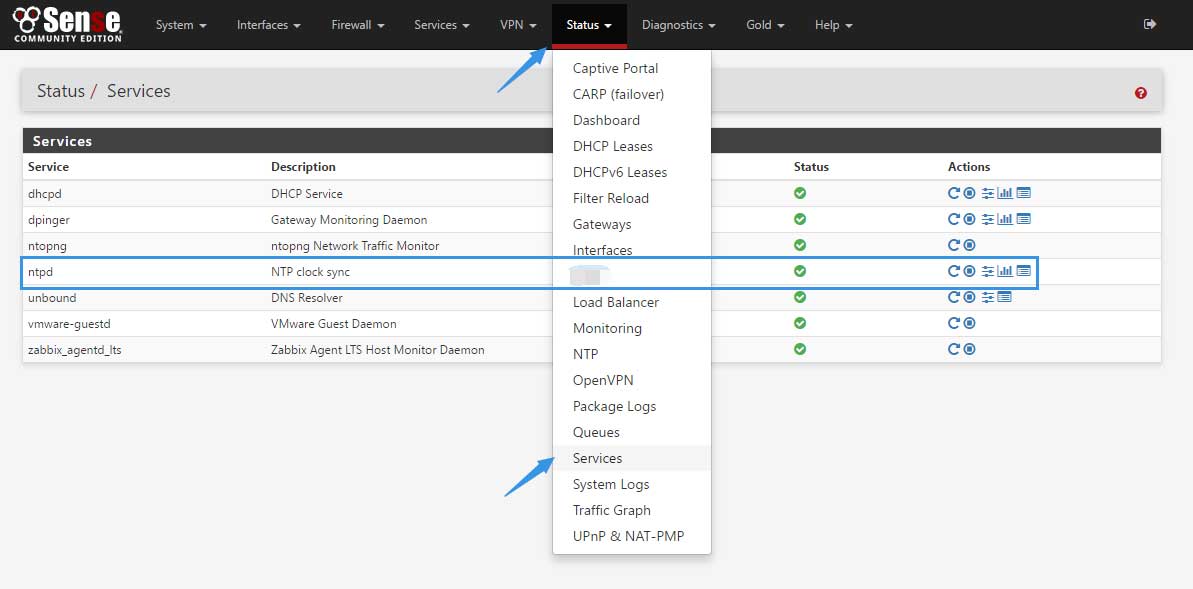
然后检查外部NTP服务器的状态,依次点击:Status –> NTP:

从上图中可以发现有许多Unreach/Pending状态的节点,这有可能是无法连接或是因为有足够源服务器提供数据而暂时停用。
至于Candidate状态的节点则是备选节点,Active Peer则为当前首选的NTP服务器。
下面我用一台安装了ntp软件包的centos7进行测试:
[root@web ~]# ntpq -p 10.1.1.1
     remote           refid      st t when poll reach   delay   offset  jitter
==============================================================================
 ns.pku.cn       .XFAC.          16 u    -  512    0    0.000    0.000   0.000
 ntp.glnet.edu.c .XFAC.          16 u    -  512    0    0.000    0.000   0.000
 mx.dlut.edu.cn  .XFAC.          16 u    -  512    0    0.000    0.000   0.000
 cert.scu.edu.cn .XFAC.          16 u    -  512    0    0.000    0.000   0.000
+202.112.26.37   210.23.18.200    2 u    6  512  177   43.690   -1.063  23.087
*dns1.synet.edu. 202.118.1.48     2 u  189  512  377   58.922    0.540  50.441
 mailgw.xanet.ed .XFAC.          16 u    -  512    0    0.000    0.000   0.000
 222.197.165.167 .XFAC.          16 u    -  512    0    0.000    0.000   0.000
+gus.buptnet.edu 10.3.9.9         4 u  533  512  277   45.440   -2.145  37.554
 202.112.0.7     .XFAC.          16 u    -  512    0    0.000    0.000   0.000
- remote:源服务器的IP地址或域名
- refid:同步时间源的标识,可能是一个无线电时钟(GPS授时等)或者是另一个NTP服务器
- st:远程服务器的层次,0最好,代表数据源可能是原子钟等硬件设备,更多信息可以参考以下页面:
- t:代表本地服务类型:
- l = 本地硬件(例如GPS)
- u = 单播
- m = 多播
- b = 广播
- – = 网络
- when:距离上次同步后的秒数
- poll:轮询间隔(单位:秒)
- reach:8位状态寄存器,1代表成功与NTP源服务器同步时间:
- 00000001 = 001
- 00000011 = 003
- 00000111 = 007
- 00001111 = 017
- 00011111 = 037
- 00111111 = 077
- 01111111 = 177
- 11111111 = 377
- delay:本地与源服务器的时延(单位:毫秒)
- offset:本地时间与源服务器时间的差值
- jitter:本地与源服务器时间的平均差(越小越好)
0x05 Centos7 应用
我们先在centos上应用。我们需要安装一个软件:
[root@web ~]# yum info ntpdate
Loaded plugins: fastestmirror
Loading mirror speeds from cached hostfile
Installed Packages
Name        : ntpdate
Arch        : x86_64
Version     : 4.2.6p5
Release     : 25.el7.centos.2
Size        : 121 k
Repo        : installed
From repo   : centos7-updates
Summary     : Utility to set the date and time via NTP
URL         : http://www.ntp.org
License     : (MIT and BSD and BSD with advertising) and GPLv2
Description : ntpdate is a program for retrieving the date and time from
            : NTP servers.
在进行同步之前,请确认系统中的时区是正确的,使用以下命令检查时间与时区:
[root@web ~]# date -R
Thu, 20 Apr 2017 23:52:18 +0800
也可以检查以下文件,查看目前所设置的时区:
[root@web ~]# ll /etc/localtime
lrwxrwxrwx. 1 root root 35 Apr  5 18:10 /etc/localtime -> ../usr/share/zoneinfo/Asia/Shanghai
如果不正确,可以通过创建软链接的方式修改:
#删除现有软链接
[root@web ~]# rm -f /etc/localtime

#新建软链接
[root@web ~]# ln -s /usr/share/zoneinfo/Asia/Shanghai /etc/localtime
然后重启系统即可生效。
确认时区后即可开始同步时间,使用以下命令进行同步:
[root@web ~]# ntpdate 10.1.1.1
21 Apr 00:01:34 ntpdate[28602]: adjust time server 10.1.1.1 offset -0.000430 sec
将以上命令添加到定时任务中:
#打开文件
[root@web ~]# vim /etc/crontab

#插入以下内容
*/5 * * * * root ntpdate 10.1.1.1

#重启crond
[root@web ~]# systemctl restart crond.service
0x06 windows 应用
windows上我使用修改策略的方式配置NTP客户端,在运行窗口中输入gpedit.msc打开策略组窗口:

然后定位到计算机配置 –> 管理模板 –> 系统 –> windows 时间服务 –> 时间提供程序,并双击打开“配置 windows NTP客户端”:
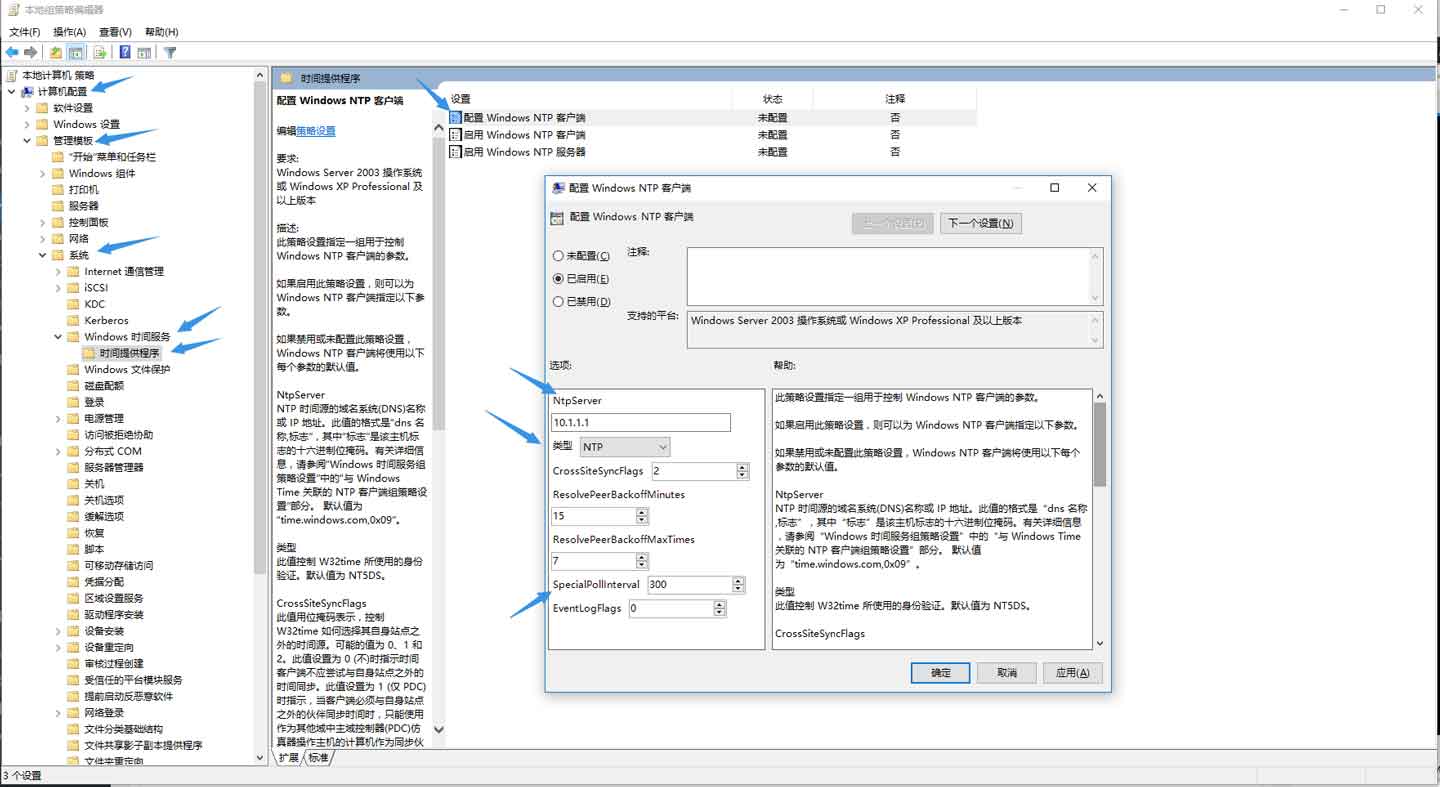
- NtpServer:填写服务器地址,我的是10.1.1.1
- 类型:NTP
- SpecialPollInterval:轮询间隔
修改完成后点击“确定”保存。
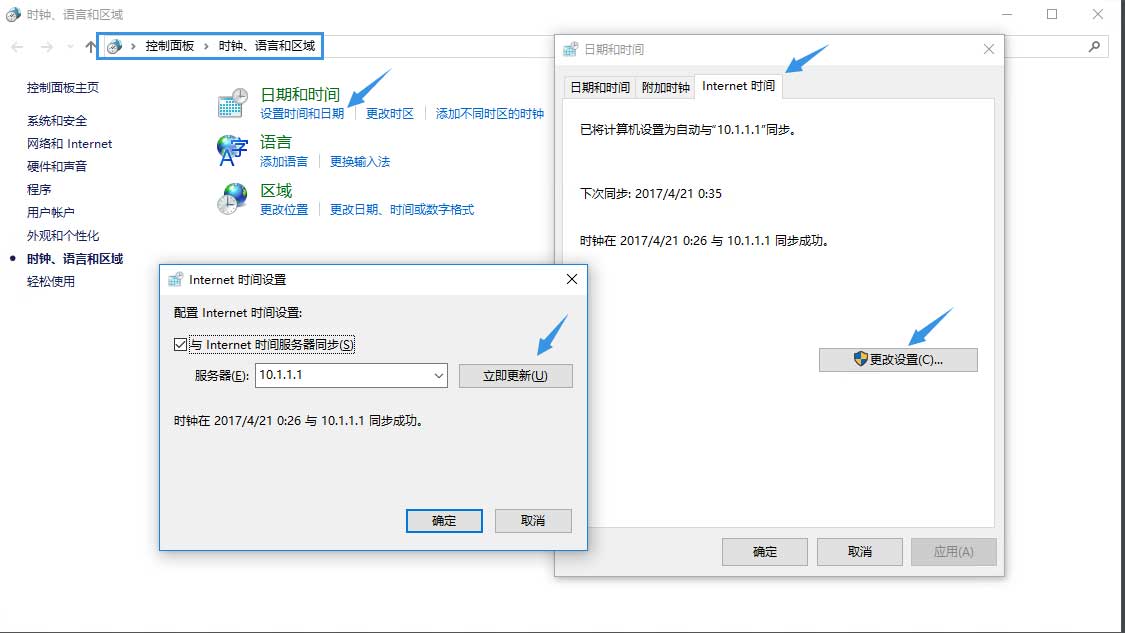
然后启动“启用 Windows NTP 客户端”与禁用“Windows NTP 服务器”:

完成后到控制面板的以下区域单击“设置时间和日期”测试同步:
0x07 结语
其实DHCP中也可以指定NTP服务器,但我发现几乎没有设备会采用DHCP中所指定的NTP服务器,都是使用软件预设的值。


