0x01 前言
http2 是什么?首先http 是一个协议,平常我们通过浏览器输入一个地址进行浏览,一般用的是http1.1 而http2 就是http 协议的2.0 版本。http1.1 是1997 开始正式使用的,其实http2 早在2012年11月就已经发布了,在经过漫长的开发、审核,终于在2015年2月正式获得IETF 批准正式使用。
http2 有什么好处?然而我也在看文档,文档很长很长…但总的来说就以下几个亮点:
- 多路复用
- HEAD 压缩
- 服务器推送
- 优先级请求
既然是新技术,我为什么不支持呢?其实我从nginx 1.9.5 开始就已经关注http2 了。直到今天我才对我的服务器进行更新升级。
0x02 nginx
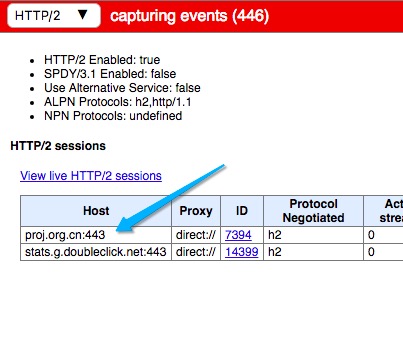
你可以在chrome 浏览器上输入以下地址,查看你的网站是否正在使用http2 :
chrome://net-internals/#http2
以下是我网站开启http2 支持后的截图:
0x02.1 编译安装
其实我在这篇文章里(nginx 1.9.10 编译安装 with ngx_lua_waf & pagespeed)的编译参数已经带有http2 的相关模块,可能是因为openssl 的原因导致不能启用http2 。那我只好下载最新的openssl 在此进行编译安装。
你可以通过这个地址下载最新的openssl :https://www.openssl.org/source/
要注意的是http2 Over TLS 需要NPN 或 ALPN 来完成协商,而OpenSSL 在1.0.2 才开始支持ALPN 。所以,请下载1.0.2 版本的openssl 。
因为我服务器上有些服务依旧依赖于旧版本的openssl ,所以我并不打算将它升级。因此我在configure nginx 时添加with-openssl 参数。
#进入存放源代码的文件夹
cd /root/codex/nginx

#下载并解压openssl
wget https://www.openssl.org/source/openssl-1.0.2h.tar.gz
tar zxvf openssl-1.0.2h.tar.gz
如果你之前按照这篇文章(nginx 1.9.10 编译安装 with ngx_lua_waf & pagespeed)的方法进行进行编译安装,请使用以下命令再次进行编译安装:
#设置LUAJIT_LIB变量
export LUAJIT_LIB=/usr/local/lib

#设置LUAJIT_INC变量
export LUAJIT_INC=/usr/local/include/luajit-2.1

#configure
./configure --prefix=/usr/local/nginx --sbin-path=/usr/sbin/nginx --conf-path=/usr/local/nginx/nginx.conf --pid-path=/var/run/nginx.pid --error-log-path=/var/log/nginx/error.log --http-log-path=/var/log/nginx/access.log --lock-path=/var/lock/nginx.lock --with-http_gunzip_module --with-pcre --with-pcre-jit --with-http_perl_module --with-http_realip_module --with-http_secure_link_module --with-http_slice_module --with-http_ssl_module --with-http_stub_status_module --with-http_sub_module --with-http_v2_module --with-http_addition_module --with-http_xslt_module --with-http_image_filter_module --with-http_geoip_module --with-http_dav_module --with-http_flv_module --with-http_mp4_module --with-http_gzip_static_module --with-http_auth_request_module --with-http_random_index_module --with-select_module --with-poll_module --with-file-aio --with-http_degradation_module --with-md5-asm --with-sha1-asm --with-libatomic --http-client-body-temp-path=/var/tmp/nginx/client_body --http-proxy-temp-path=/var/tmp/nginx/proxy --http-fastcgi-temp-path=/var/tmp/nginx/fastcgi --http-uwsgi-temp-path=/var/tmp/nginx/uwsgi --http-scgi-temp-path=/var/tmp/nginx/scgi --add-module=/usr/local/nginx/module/ngx_devel_kit --add-module=/usr/local/nginx/module/lua-nginx-module --with-ld-opt=-Wl,-rpath,$LUAJIT_LIB --with-openssl=/root/codex/openssl/openssl-1.0.2h/

#编译
make

#安装
make install
如果你并不需要lua-nginx-module ,请使用以下configure 参数:
#configure
./configure --prefix=/usr/local/nginx --sbin-path=/usr/sbin/nginx --conf-path=/usr/local/nginx/nginx.conf --pid-path=/var/run/nginx.pid --error-log-path=/var/log/nginx/error.log --http-log-path=/var/log/nginx/access.log --lock-path=/var/lock/nginx.lock --with-http_gunzip_module --with-pcre --with-pcre-jit --with-http_perl_module --with-http_realip_module --with-http_secure_link_module --with-http_slice_module --with-http_ssl_module --with-http_stub_status_module --with-http_sub_module --with-http_v2_module --with-http_addition_module --with-http_xslt_module --with-http_image_filter_module --with-http_geoip_module --with-http_dav_module --with-http_flv_module --with-http_mp4_module --with-http_gzip_static_module --with-http_auth_request_module --with-http_random_index_module --with-select_module --with-poll_module --with-file-aio --with-http_degradation_module --with-md5-asm --with-sha1-asm --with-libatomic --http-client-body-temp-path=/var/tmp/nginx/client_body --http-proxy-temp-path=/var/tmp/nginx/proxy --http-fastcgi-temp-path=/var/tmp/nginx/fastcgi --http-uwsgi-temp-path=/var/tmp/nginx/uwsgi --http-scgi-temp-path=/var/tmp/nginx/scgi --add-module=/usr/local/nginx/module/ngx_devel_kit --with-openssl=/root/codex/openssl/openssl-1.0.2h/

#编译
make

#安装
make install
停止并重新启动nginx :
#停止nginx
nginx -s quit

#启动nginx
nginx
完成后测试下自己的服务吧。
0x03 curl for mac
我MacBook 的curl 版本信息:
MacBook-Air:~ terence$ curl -V
curl 7.43.0 (x86_64-apple-darwin15.0) libcurl/7.43.0 SecureTransport zlib/1.2.5
Protocols: dict file ftp ftps gopher http https imap imaps ldap ldaps pop3 pop3s rtsp smb smbs smtp smtps telnet tftp
Features: AsynchDNS IPv6 Largefile GSS-API Kerberos SPNEGO NTLM NTLM_WB SSL libz UnixSockets
通过brew 安装:
brew install curl --with-nghttp2
创建链接:
sudo ln /usr/local/Cellar/curl/7.49.1/bin/curl /usr/local/sbin/
测试:
/usr/local/sbin/curl -I --http2 https://ngx.hk
HTTP/2 200
server: OdinServer/0.1.2
date: Sat, 25 Jun 2016 15:37:22 GMT
content-type: text/html; charset=UTF-8
vary: Cookie
link: <https://ngx.hk/wp-json/>; rel="https://api.w.org/", <http://wp.me/P7yURE-C>; rel=shortlink
set-cookie: wfvt_1373194275=576ea532d14a6; expires=Sat, 25-Jun-2016 16:07:22 GMT; Max-Age=1800; path=/; HttpOnly
cache-control: max-age=0, no-cache
x-content-type-options: nosniff
x-xss-protection: 1; mode=block
strict-transport-security: max-age=31536000; preload; includeSubDomains;
0x04 结语
可能是我网络太好了,也有可能是我并没有使用http2 的其它功能或者还没配置好,升级完成后并没发现加载速度与之前有什么区别。过两天我找个时间来次压力测试。


 – OpenVZ 达拉斯数据中心")


